Game Jam
My first Game Jam
What is a Game Jam?
A game jam is a time-limited project where you try to develop a small game. There is almost always a specific theme or genre that you have to stick to. For this game jam, the theme was alchemy and shadows, which means that the game mechanics or design should have some connection to alchemy and shadows. Whatever you might understand by that. Alchemy can be, for example, transformation or combining, or directly the brewing of potions. Shadow can have to do with light and shadow, hiding, or something that happens in secret. There was also the restriction that the game must run in the browser and that the assets you use must allow commercial use. This game jam lasted 2 weeks, many are shorter, some a little longer, but you always have less time than you actually need.
I did the game jam because I think it’s an interesting project, I like playing games and I’ve been involved in game development in the past. It was also an easy choice for me because I was unemployed and had the time for it.
Getting started
I signed up a month before the game jam started, at that time the topic was not yet known, it was only announced on the day the game jam started. I did the game jam together with another developer, we started brainstorming and collected various ideas. We were most interested in one idea and worked it out the most during the brainstorming session. It was about a kind of management game with vampires. They have a lair in the city that can be expanded, with familiars who take on various tasks during the day, at night the vampires are active and go hunting. There would also be missions and battles, and the combat system was somewhat reminiscent of Shadowrun and XCOM. The next part was then to drastically cut scope. First, all ideas except for the vampire management were thrown out, then we decided that from this idea the combat part was more interesting for us than the management, then the combat system was also largely cut down in order to perhaps still be able to create it in 2 weeks. Many of the ideas we liked there would probably come back in if we were to continue after the game jam, but at the moment they don’t fit in. Thematically it would fit with vampires, because they only dare to go out at night, one of the abilities should also be a shadow form, which would allow vampires to move through obstacles and not be attacked while doing so. Alchemy would fit because humans would be transformed by vampires.
Division of tasks
I wanted to do the project together with another developer. As an experienced developer, I would program the systems and make the 3D assets based on my knowledge of Blender. The other developer would do the UI, music and content.
Unfortunately, a trial working day for a company and a coding challenge for another company fell into the game jam, which is why I didn’t have as much time for the game jam as I had initially thought. Of course, these took priority, but they also cost me a lot of valuable time.
Engine
I chose Godot as my engine. I had done a few smaller projects with Unity in the past, but after the controversy with Unity, I wanted to try something else. With Godot you can do good 2D and some 3D, not very complex stuff, it can’t keep up with Unreal Engine, but for a simple game it should be a good choice and not too hard to get into. A big plus is also that Godot is open source, which should make it a lot easier for me, if I get stuck somewhere I can look up what’s happening and why something isn’t working.
Implementation
Especially for the beginning we wanted to use a few placeholder assets quickly and then exchange them later when we have a playable version. Unfortunately, we never got that far, so the latest version still has the placeholders in it.
In the beginning it was also planned to make the game with 2D assets, we already collected some assets., but finding animated characters that were free turned out to be difficult. We found a few, but the style was a complete mess. 3D assets at least have the advantage that you can re-map animations to another model as long as the skeleton is compatible for the animation.
We had also considered making only the characters in 3D. To integrate 3D elements in 2D in Godot you have to render the 3D model on a separate texture and then you could embed that, unfortunately a bit too cumbersome, the next best thing would be to insert 2D into a 3D environment. Now we just did everything in 3D. But it’s a bit more complicated to make an interesting graphic style in 3D. A hybrid of 2D environment and 3D characters is something I still want to look at in the future.
3D Assets
Barricade
I made a small barricade for the game myself in Blender. It’s been a long time since I worked with UV-Maps and I had to get back into it.
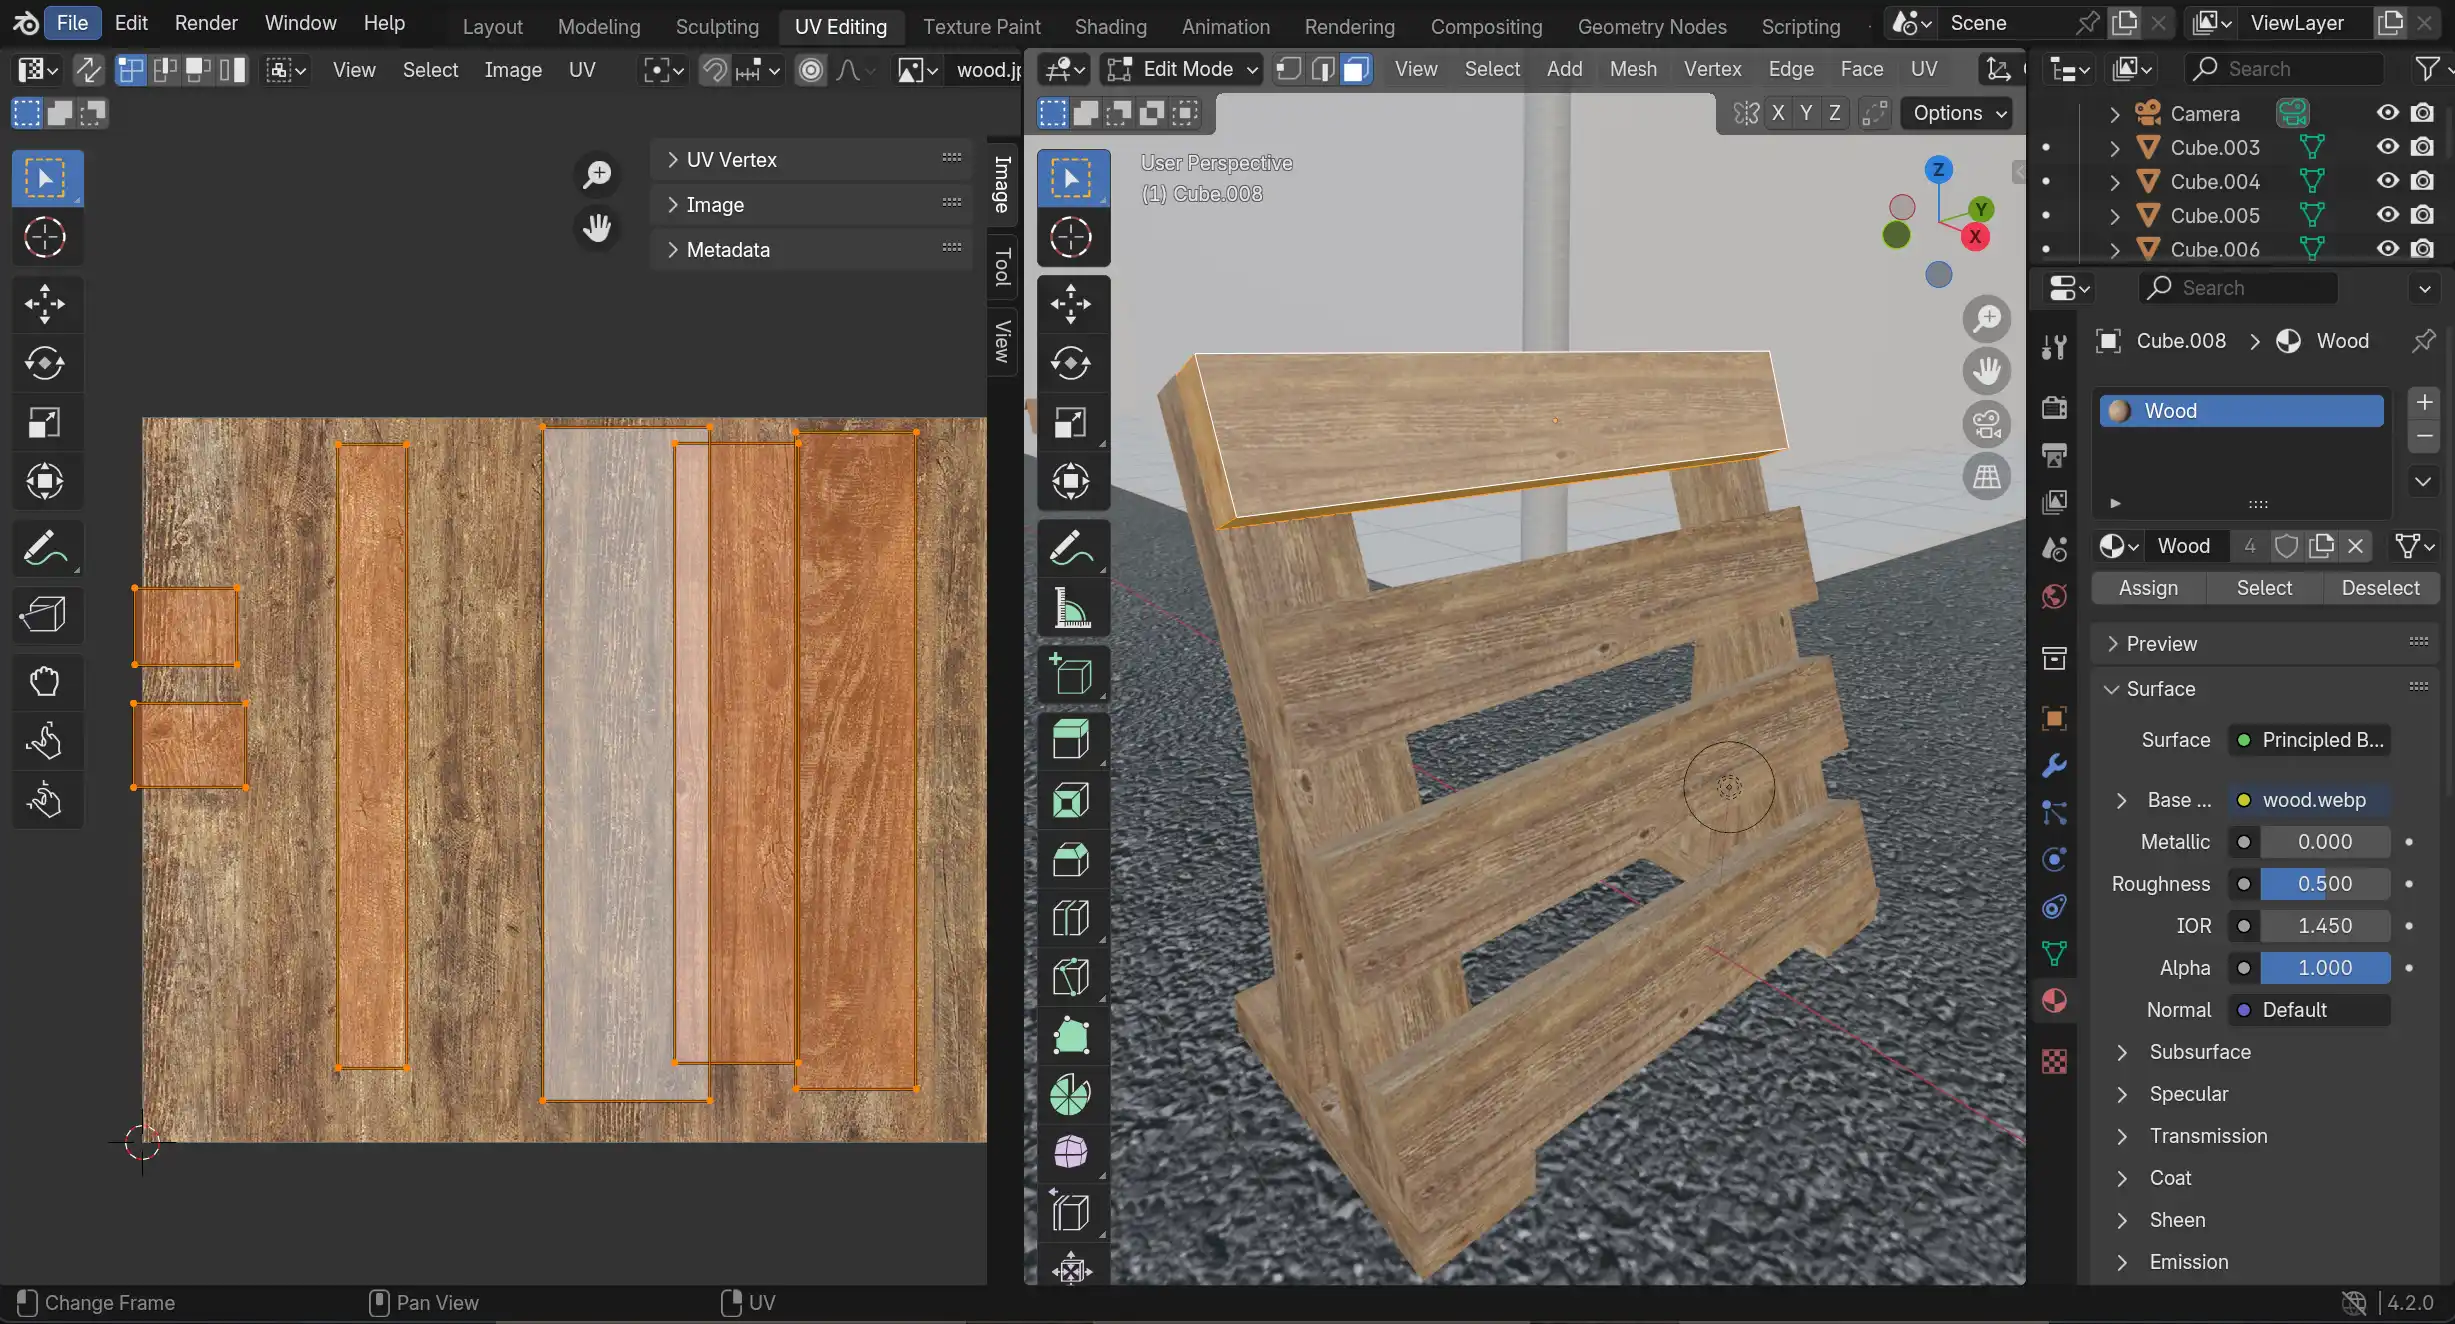
UV maps are used for texturing models, the U and V coordinates point to a 2D area in a texture, this area is then drawn on a surface of the 3D model. I only used a single texture for my barricade.
Blender Default Assets
Blender offers various assets with a license that also allows commercial use. You just have to find them first, they are not automatically installed. I used a “Body Male - Primitive (Realistic)” as a basis, I actually wanted to model and texture it a bit more to make it look more like a vampire, but I didn’t get around to it. It’s hard to find free 3D models online that are any good, all good models cost money.
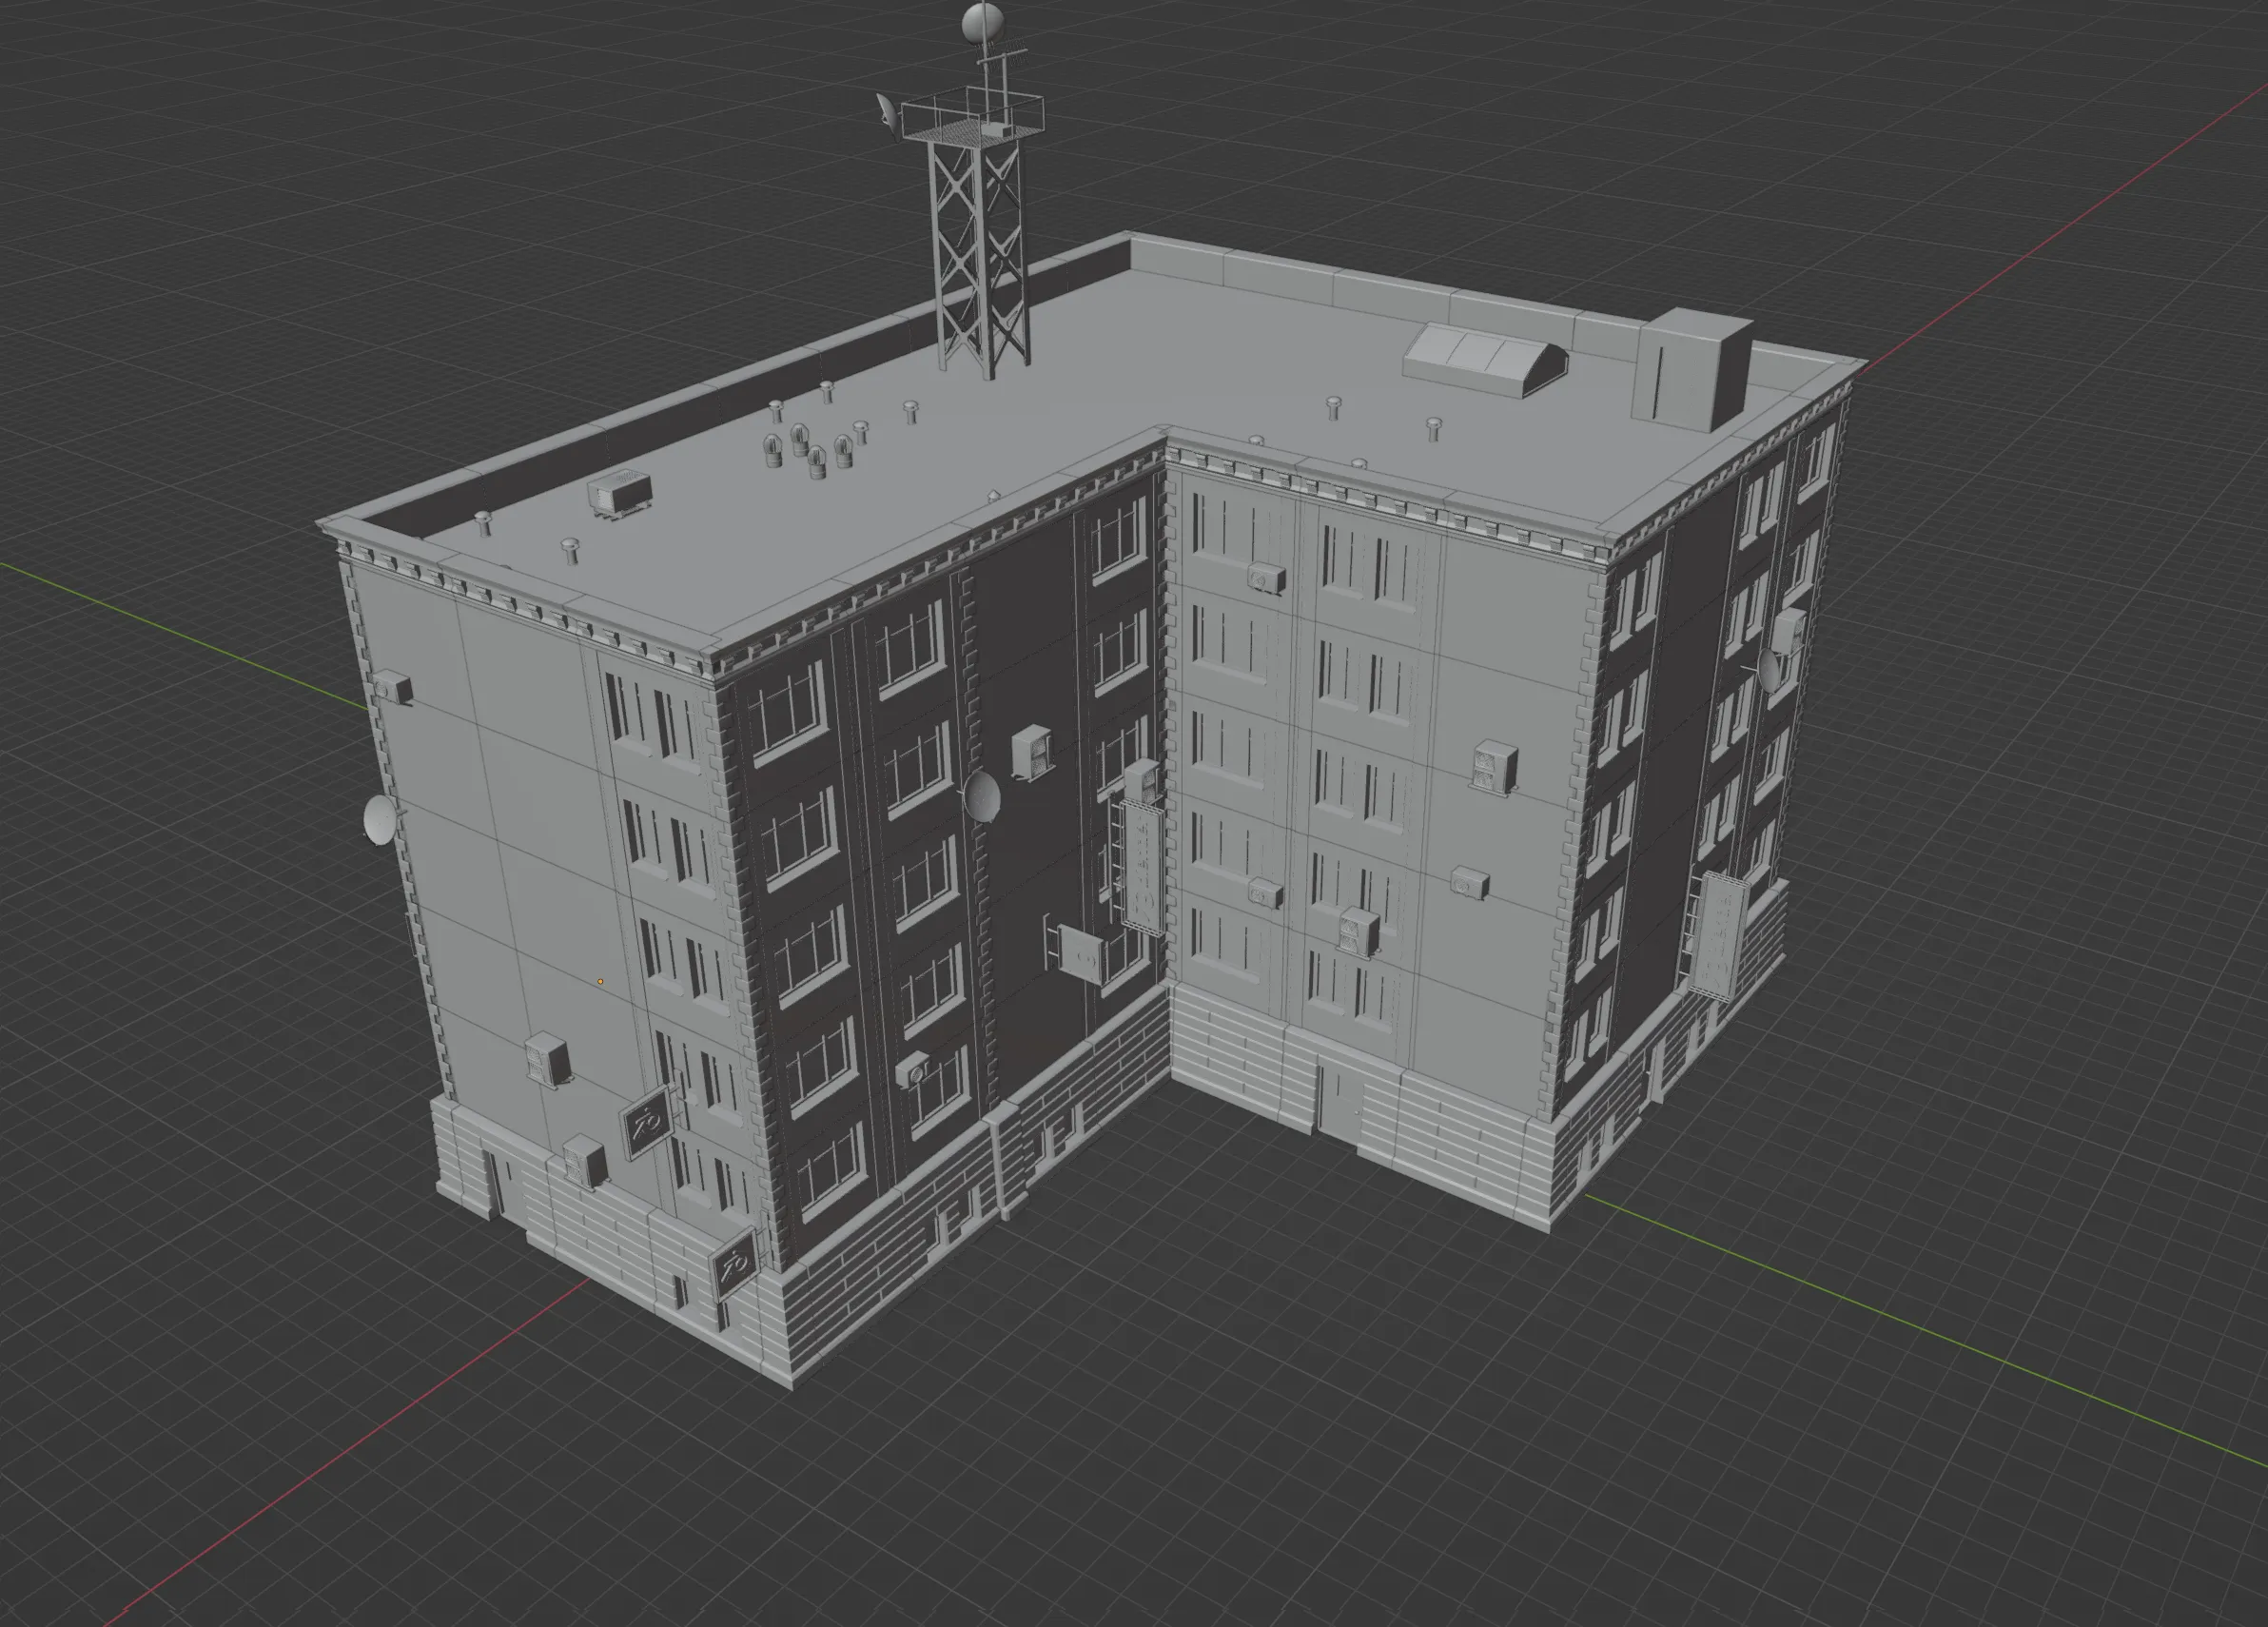
Buildify
Buildify is a free Blender file that you can download, with which you can then design buildings very easily with the help of Geometry Nodes. You simply define a base area and a building is then put together from various modules using GeometryNodes.
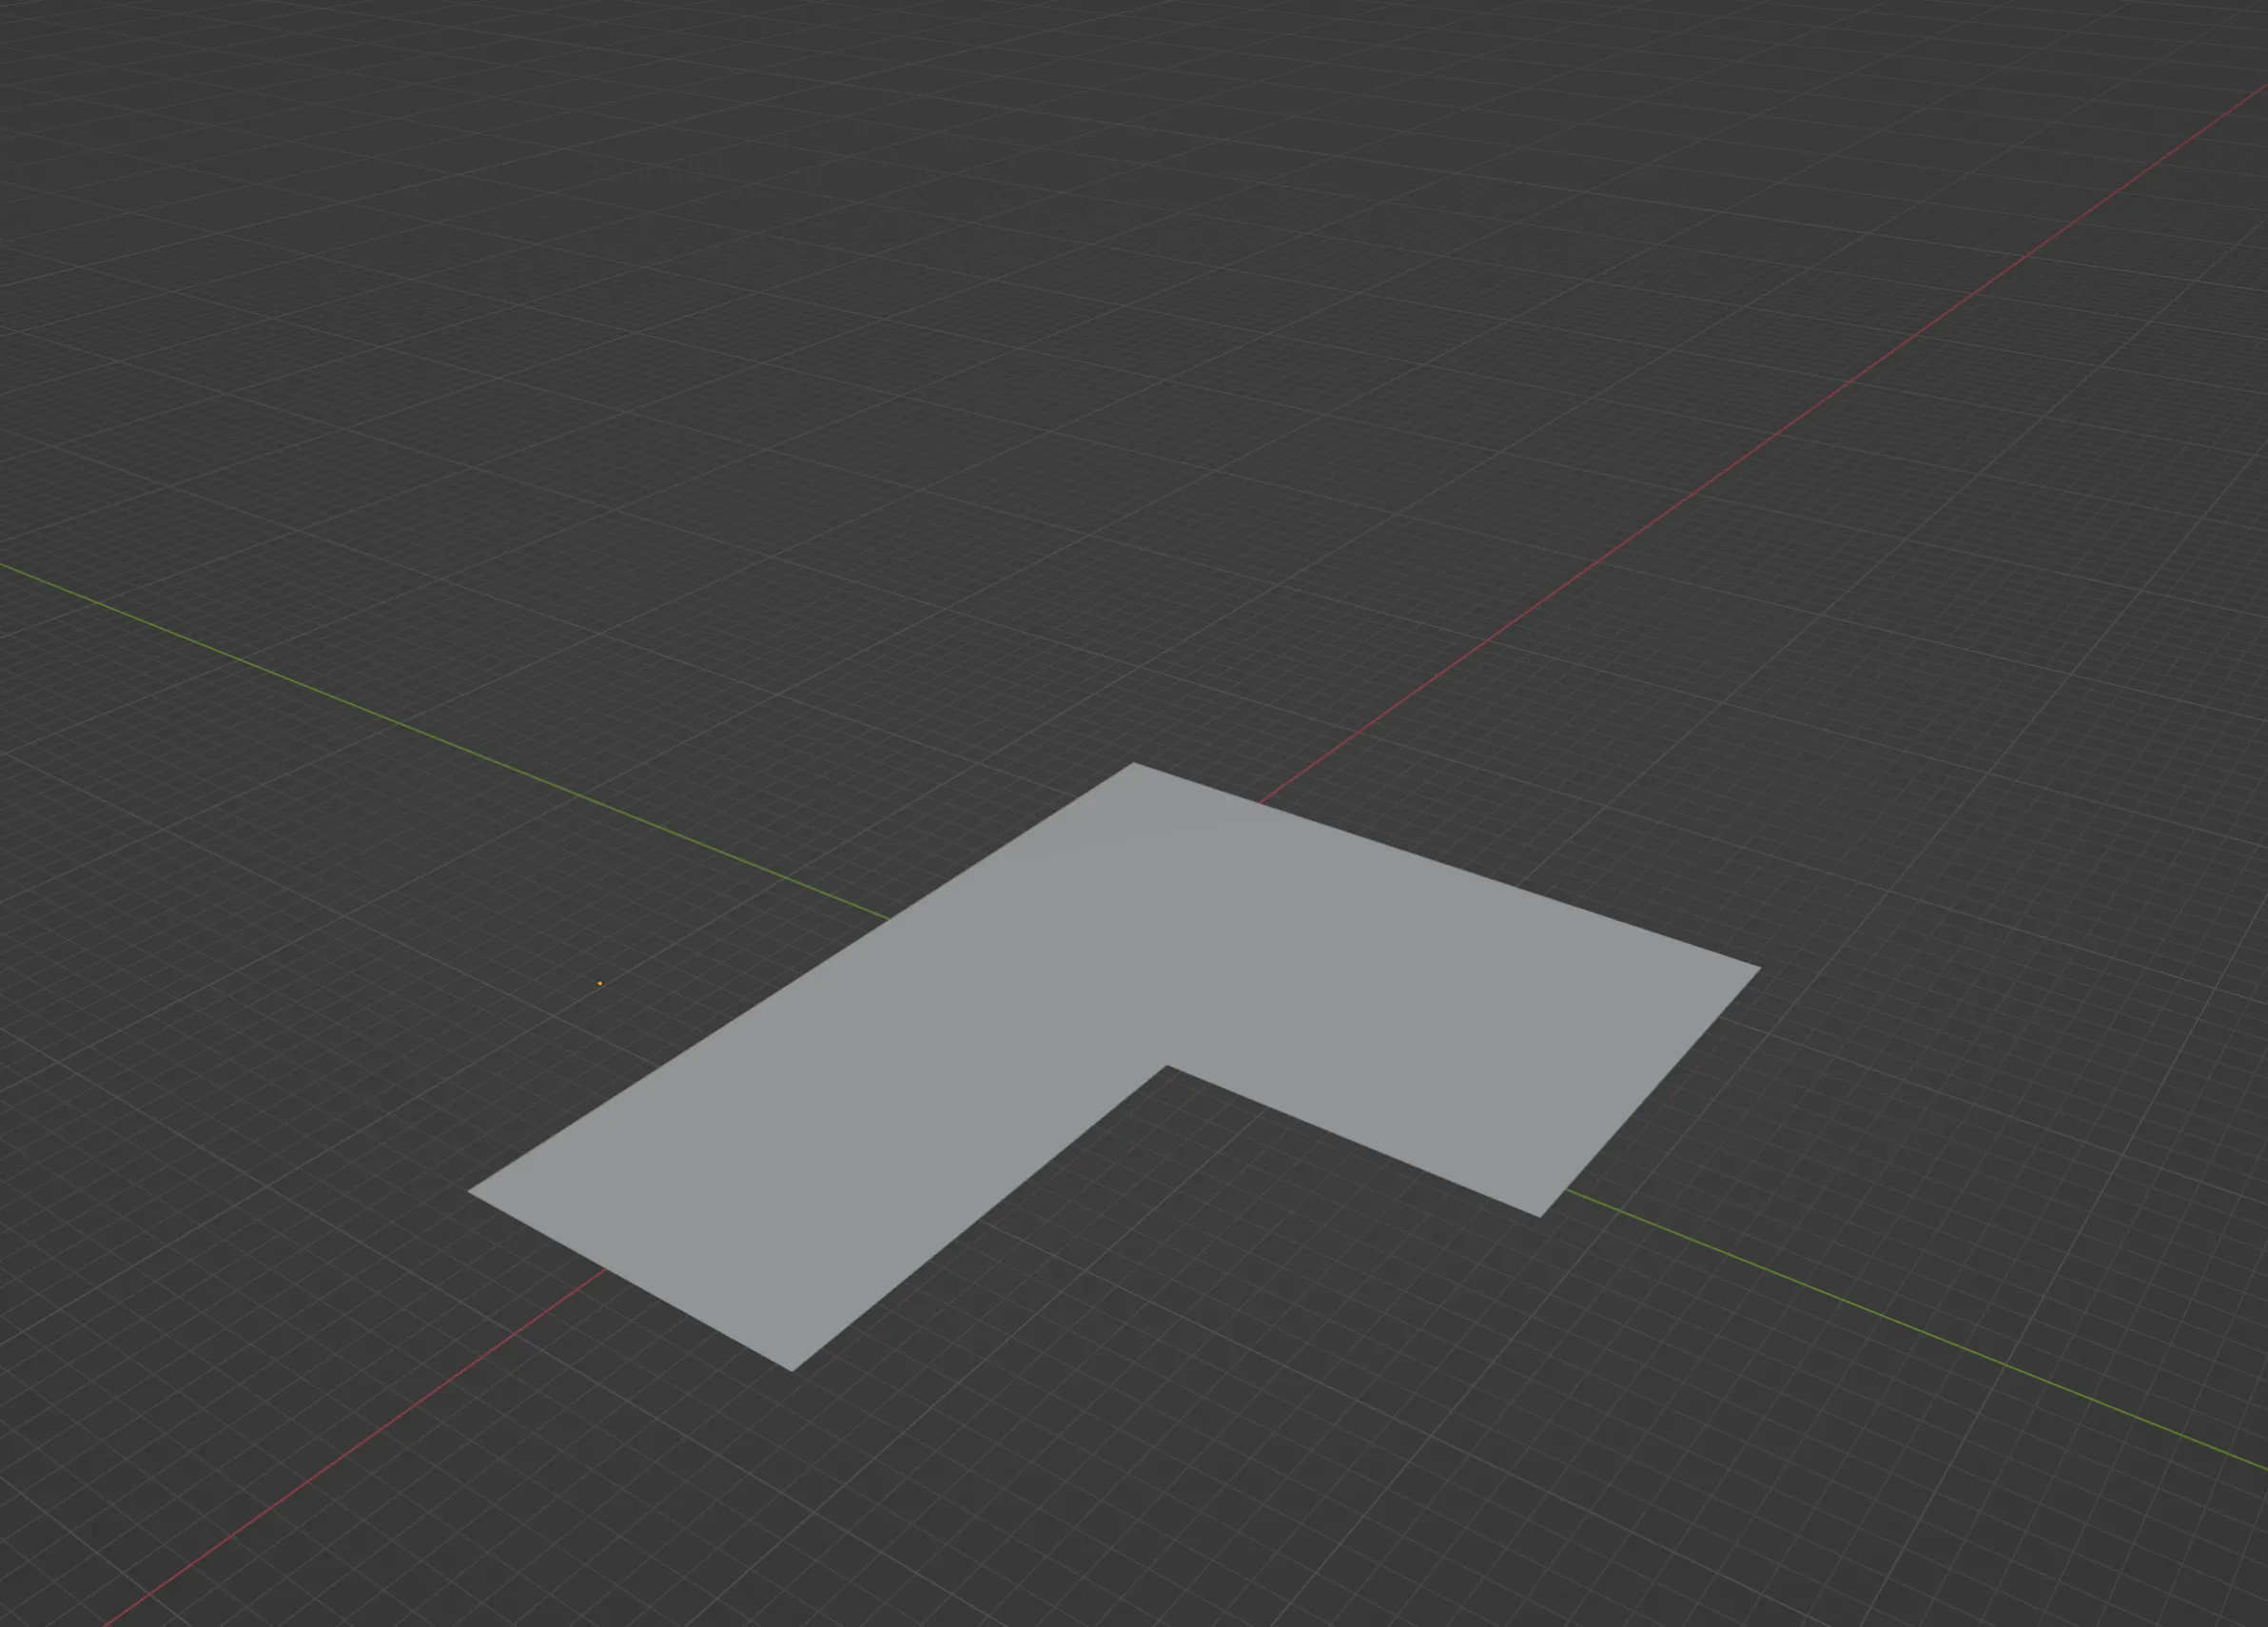
You can also replace the modules with your own.
GeometryNodes are a node-based system in Blender with which you can link various operations together to create a new model or geometry.
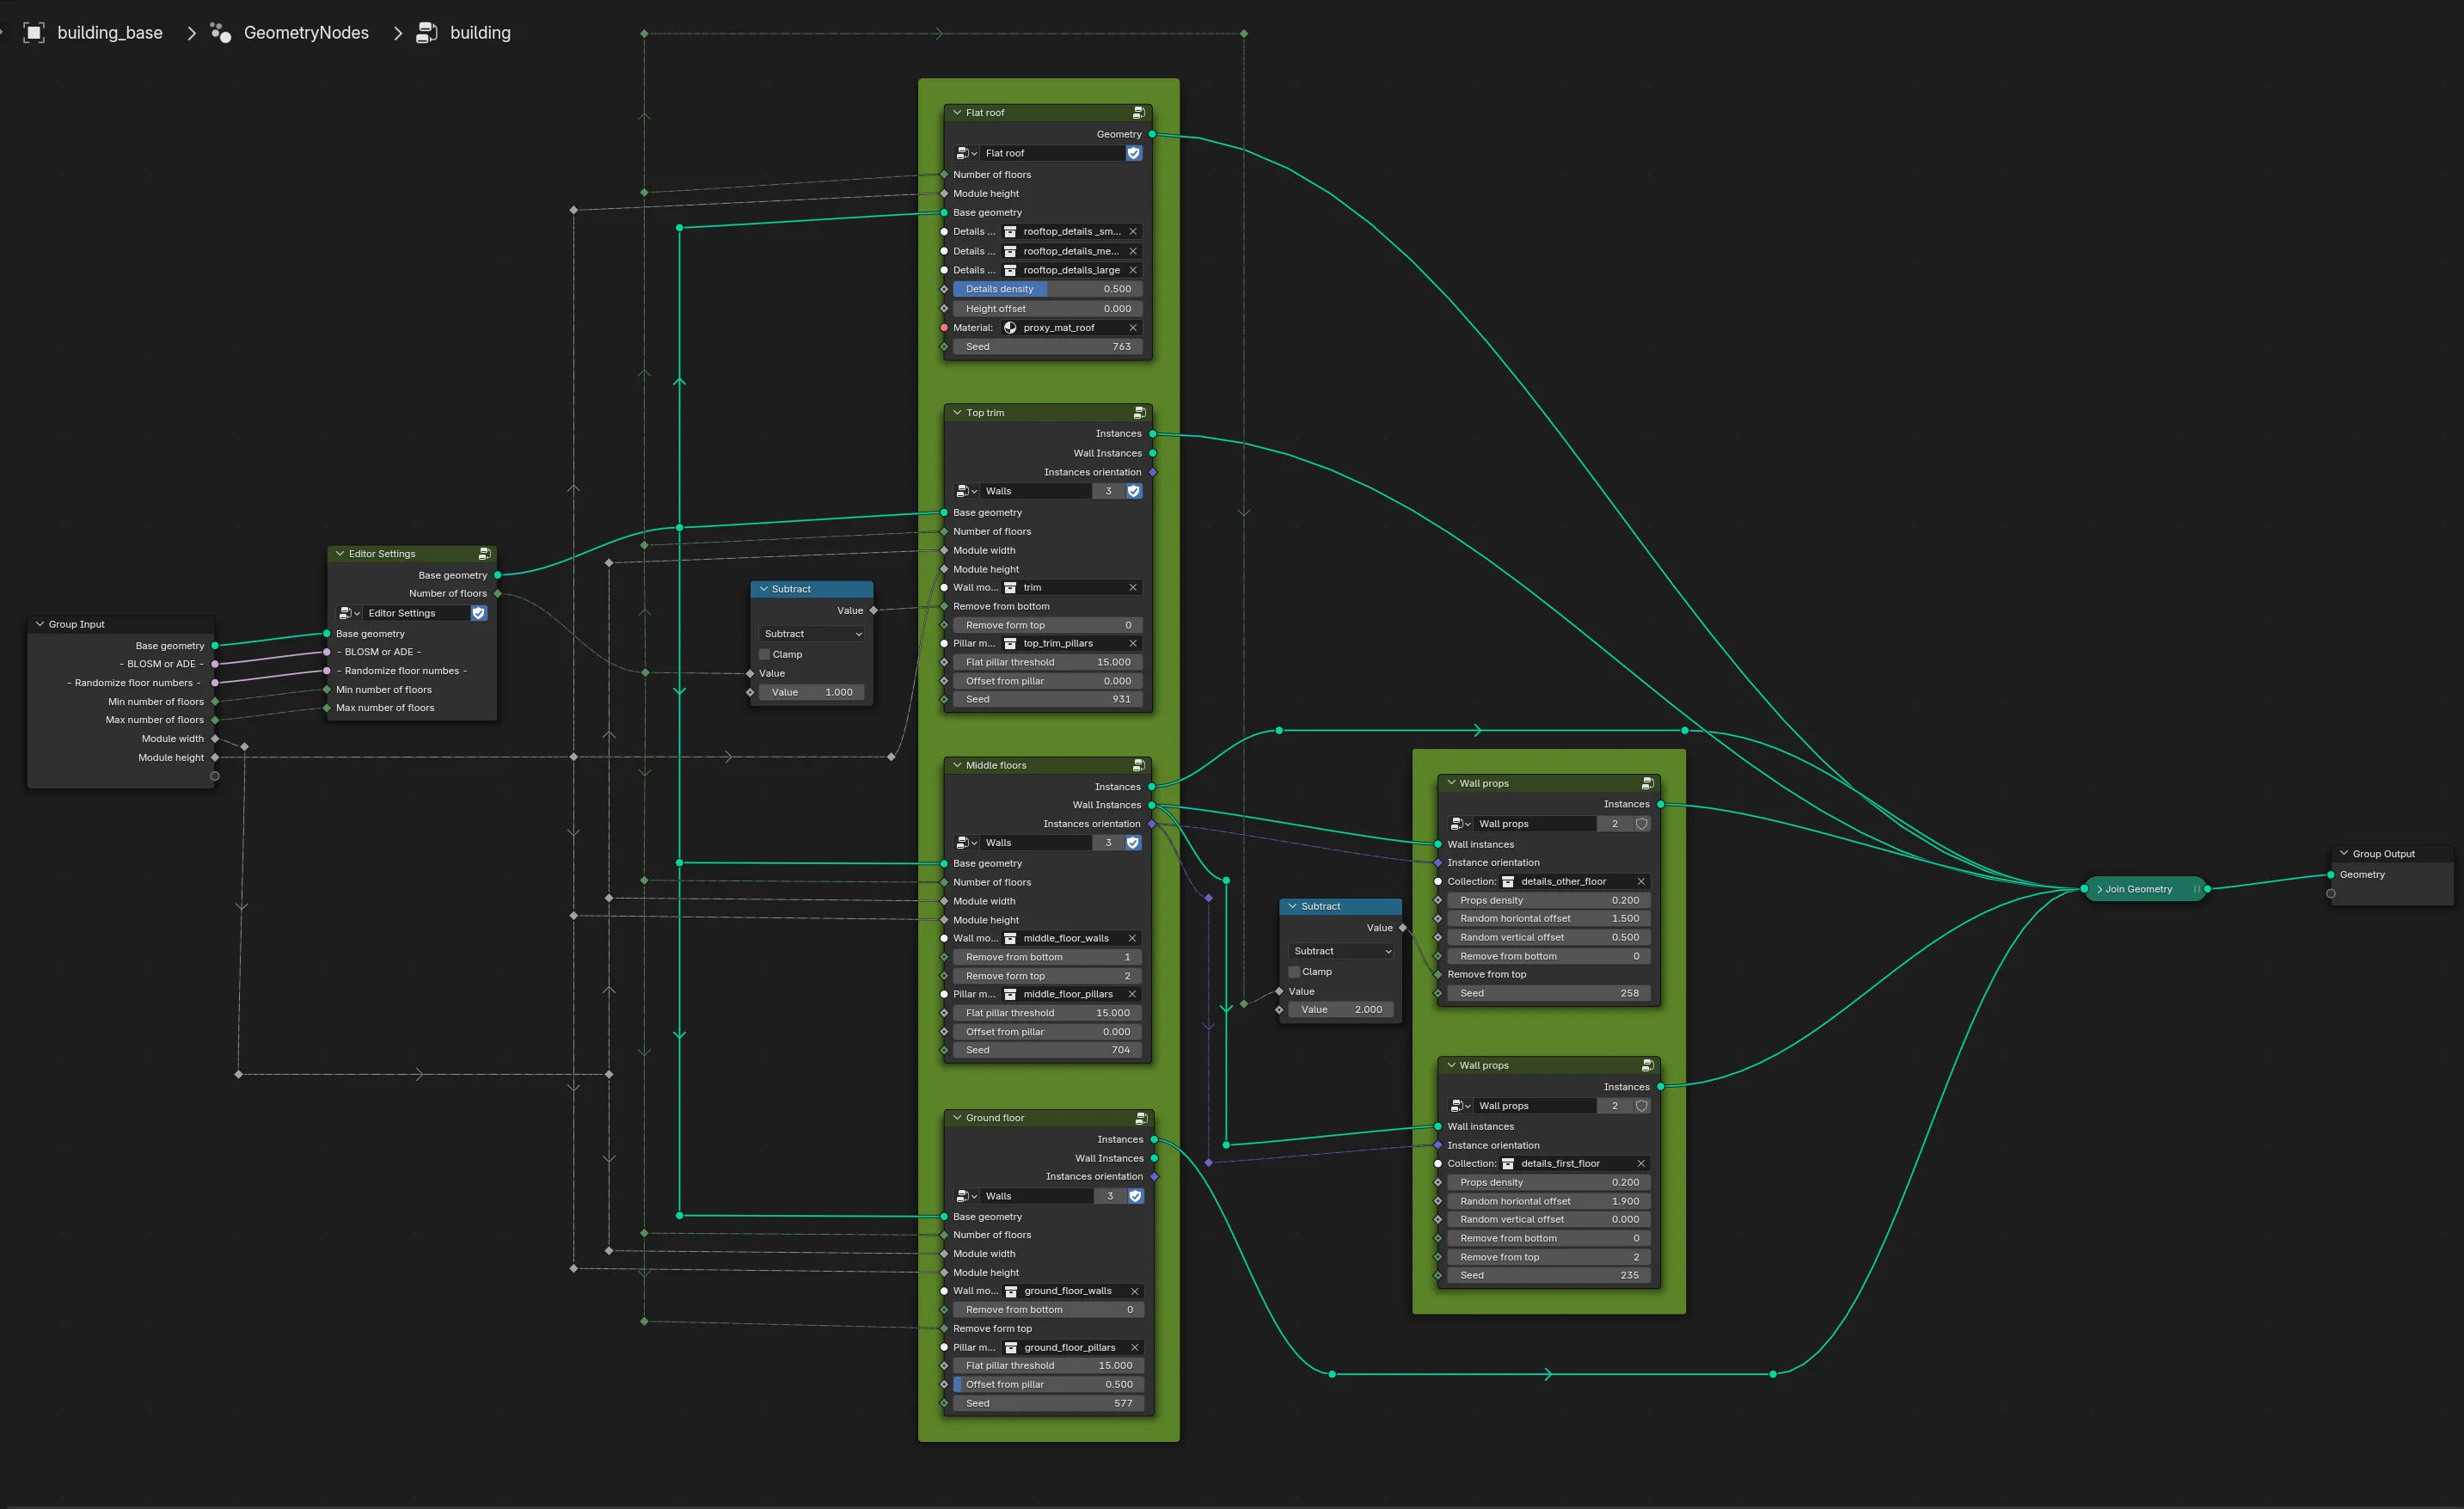
This is only a small section of the GeometryNodes, each of the green nodes themselves consists of several sub-nodes. Roughly speaking, Buildify works by classifying the geometry of the base area into edges (no walls are created along lines within the base area, only along the border) and corners (separate modules for corner pieces). Then divide the length of the individual edge pieces by the size of the module to place the modules there and if the number does not add up completely, the modules are stretched slightly to cover the entire length. This is repeated for the different floors of the building, for which different modules can then be used. The first floor usually has different modules than the rest. For the roof, the available area is subdivided according to where there is space for large, medium or small details, the corresponding roof modules are placed there and then modules are randomly removed again to have some free space on the roof.
Buildify alternatives
I also had a look at some other possibilities to quickly create buildings in Blender, two of them looked quite interesting, but in contrast to Buildify they cost money. Procedural Building Generator and Auto-Building. I’ll buy one of them if I get the chance to use it, maybe at the next game jam if I need buildings again. With these two you have much more control over the appearance of the buildings, because the 3-dimensional shape of a model is used and not just the base area, as with Buildify.
Animations
Mixamo
Mixamo is a website where you can transfer animations to models free of charge. The site can even do the rigging for you. After defining a few important points on the model, the page loads for a few minutes and then you can select animations from the library and see them live on the model.
Multiple animations in Blender
Something I’ve never needed before is to have multiple animations on a 3D model in Blender. Unfortunately I don’t find this very intuitive and I had to do some research on how to get it done.
If you make an animation via Mixamo, you have to download the model afterwards and in the file there is then only this one animation, via Mixamo you cannot define several animations at once. You then have to put the animations together separately yourself. One way to do this via Blender is to import all the models into a Blender scene. You then have the same model many times, with only one animation each time. You can delete all but one. The animation tracks of the models you have deleted will still be in the Blender file.
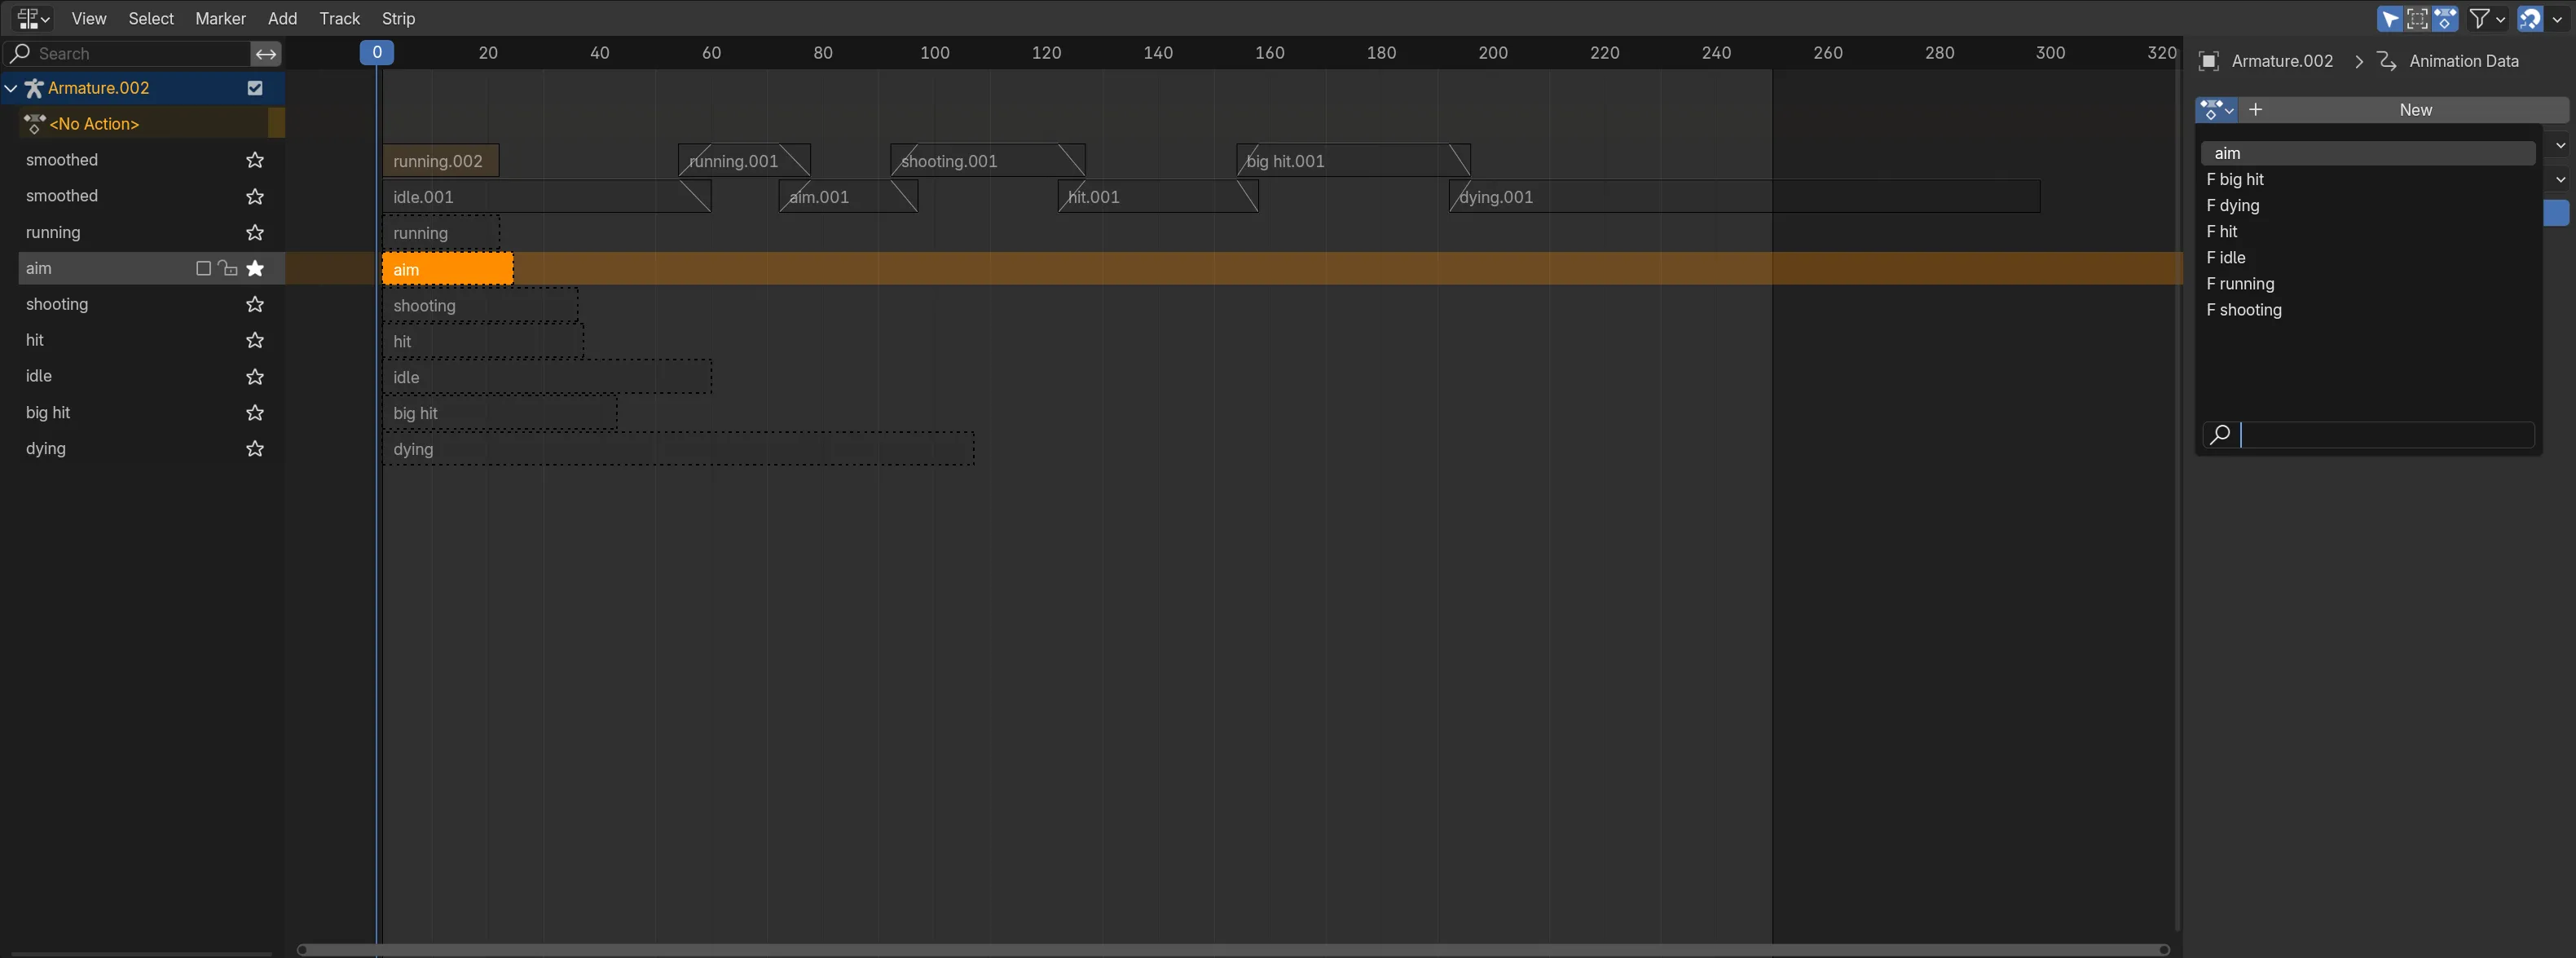
You can still access all animation tracks via the Dopesheet Editor even if the corresponding models and armatures have been deleted.
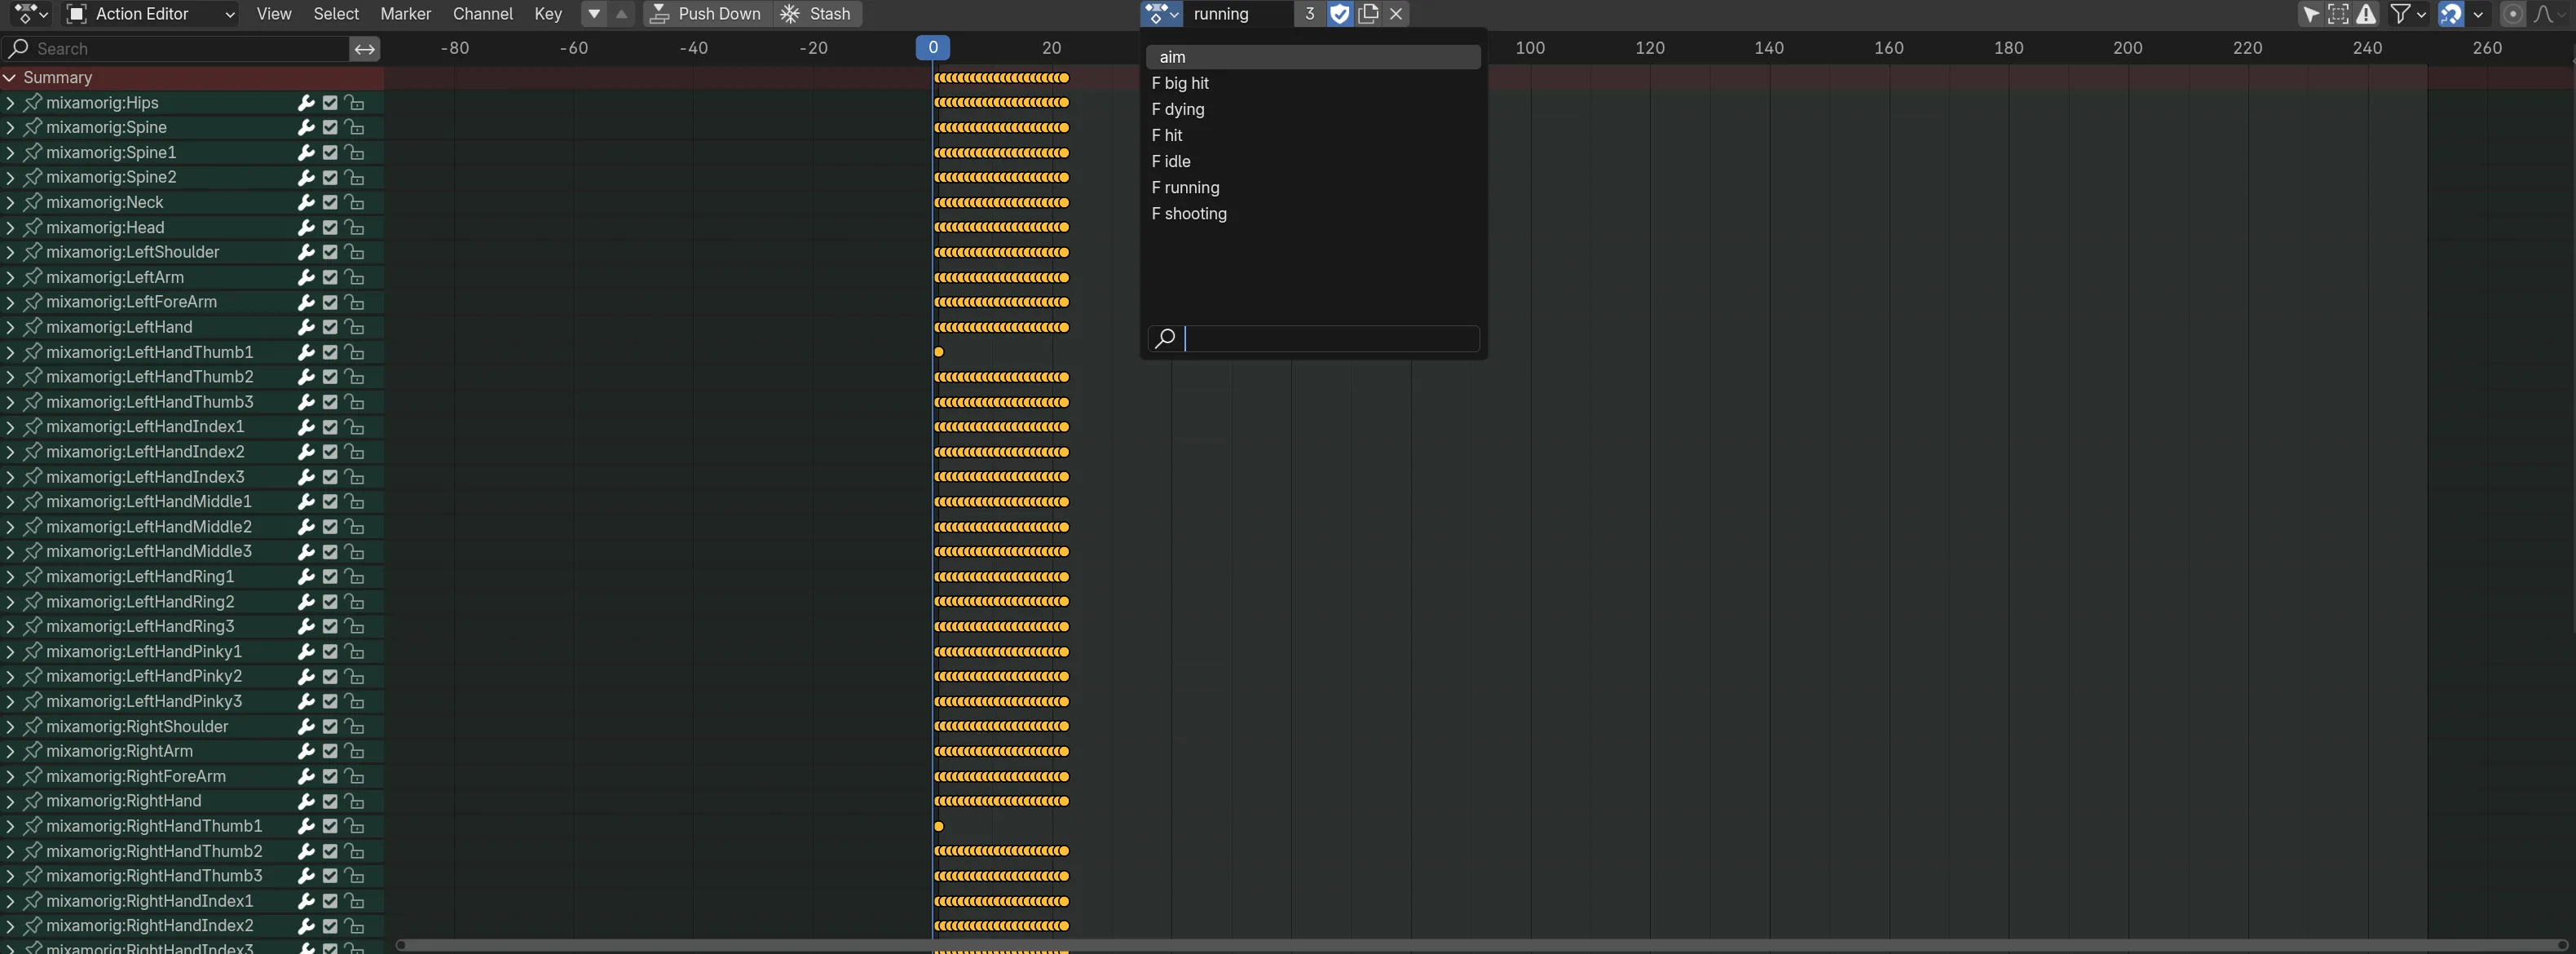
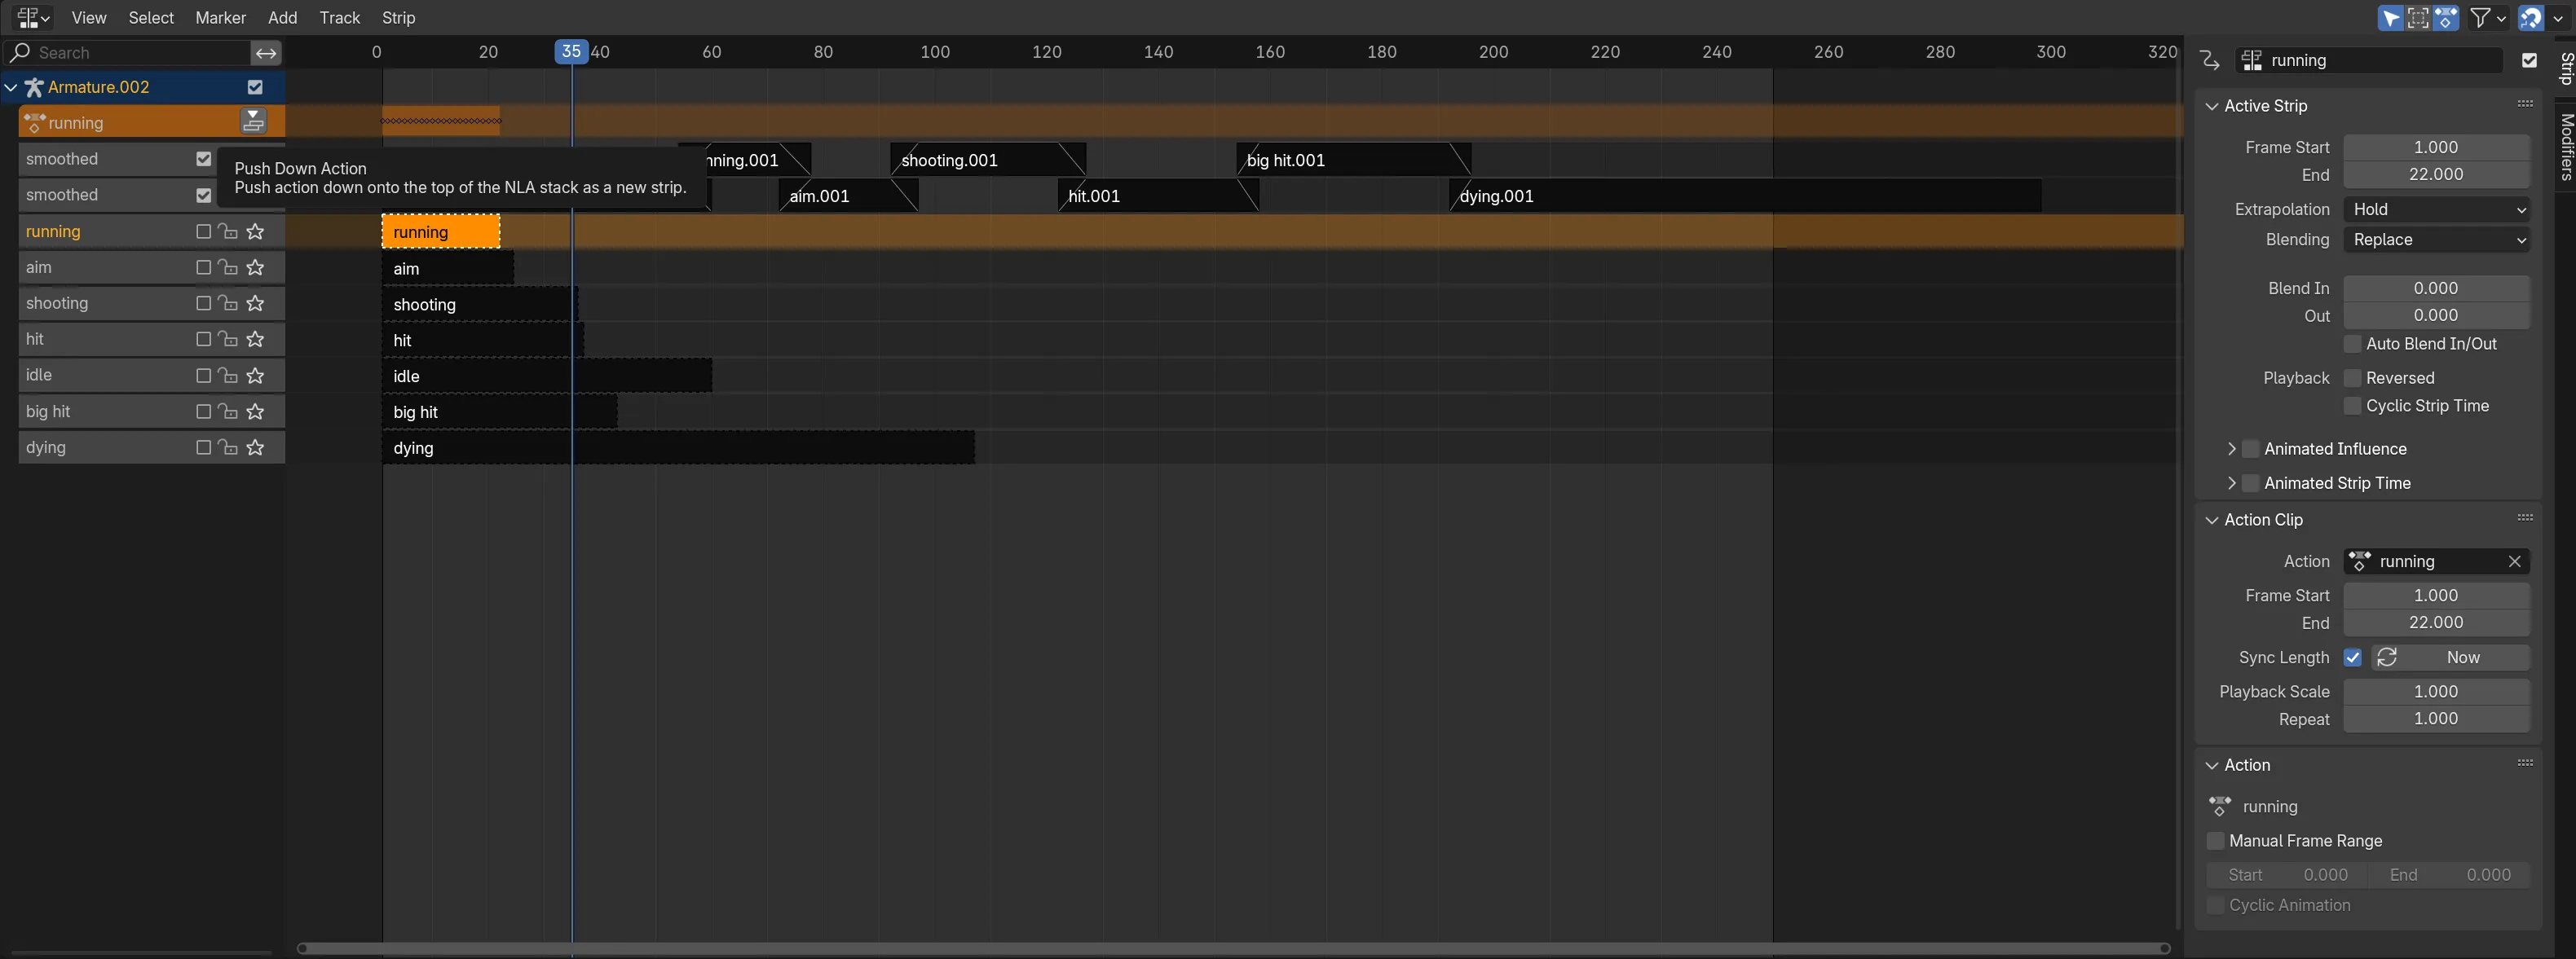
To be able to use the animations in Godot, you have to convert the animation tracks into “animation strips” or “clips”. You can use the NLA editor (Non-Linear Animation) in Blender for this. In the orange area, the current strip is displayed, which you can edit. If this is selected, you can select a track on the right and then press “push down” to convert the track into a new named clip.
If you then export them as GLTF and import them back into Godot, you have an AnimationPlayer on the model that contains the clips, which you can connect to an AnimationTree node and then use the animations in the game.
In Blender you can also place several animations in a strip and define transitions between the animations. This is useful to reuse several recurring animations for a longer animation in Blender, but for Godot, where we want to have the animations individually and then mix them in-engine, this is not necessary.
Animation Trees
In many game engines there is a system to link animations to conditions and to configure the transitions of the animations into each other. In Godot the system is called AnimationTree.
Above, it plays all animations one after the other, without transitions, which does not look good due to the abrupt movements. Below, the animations are played again one after the other, but with transitions in between. The transitions are created by mixing the animations together over a period of time and, for example, interpolating new positions for the limbs between the positions as they would be in the 2 animations that are mixed. This gives you a pretty good result without having to adjust the animation for the transitions afterwards. There are more complex systems that make better transitions, but for this, it is sufficient.
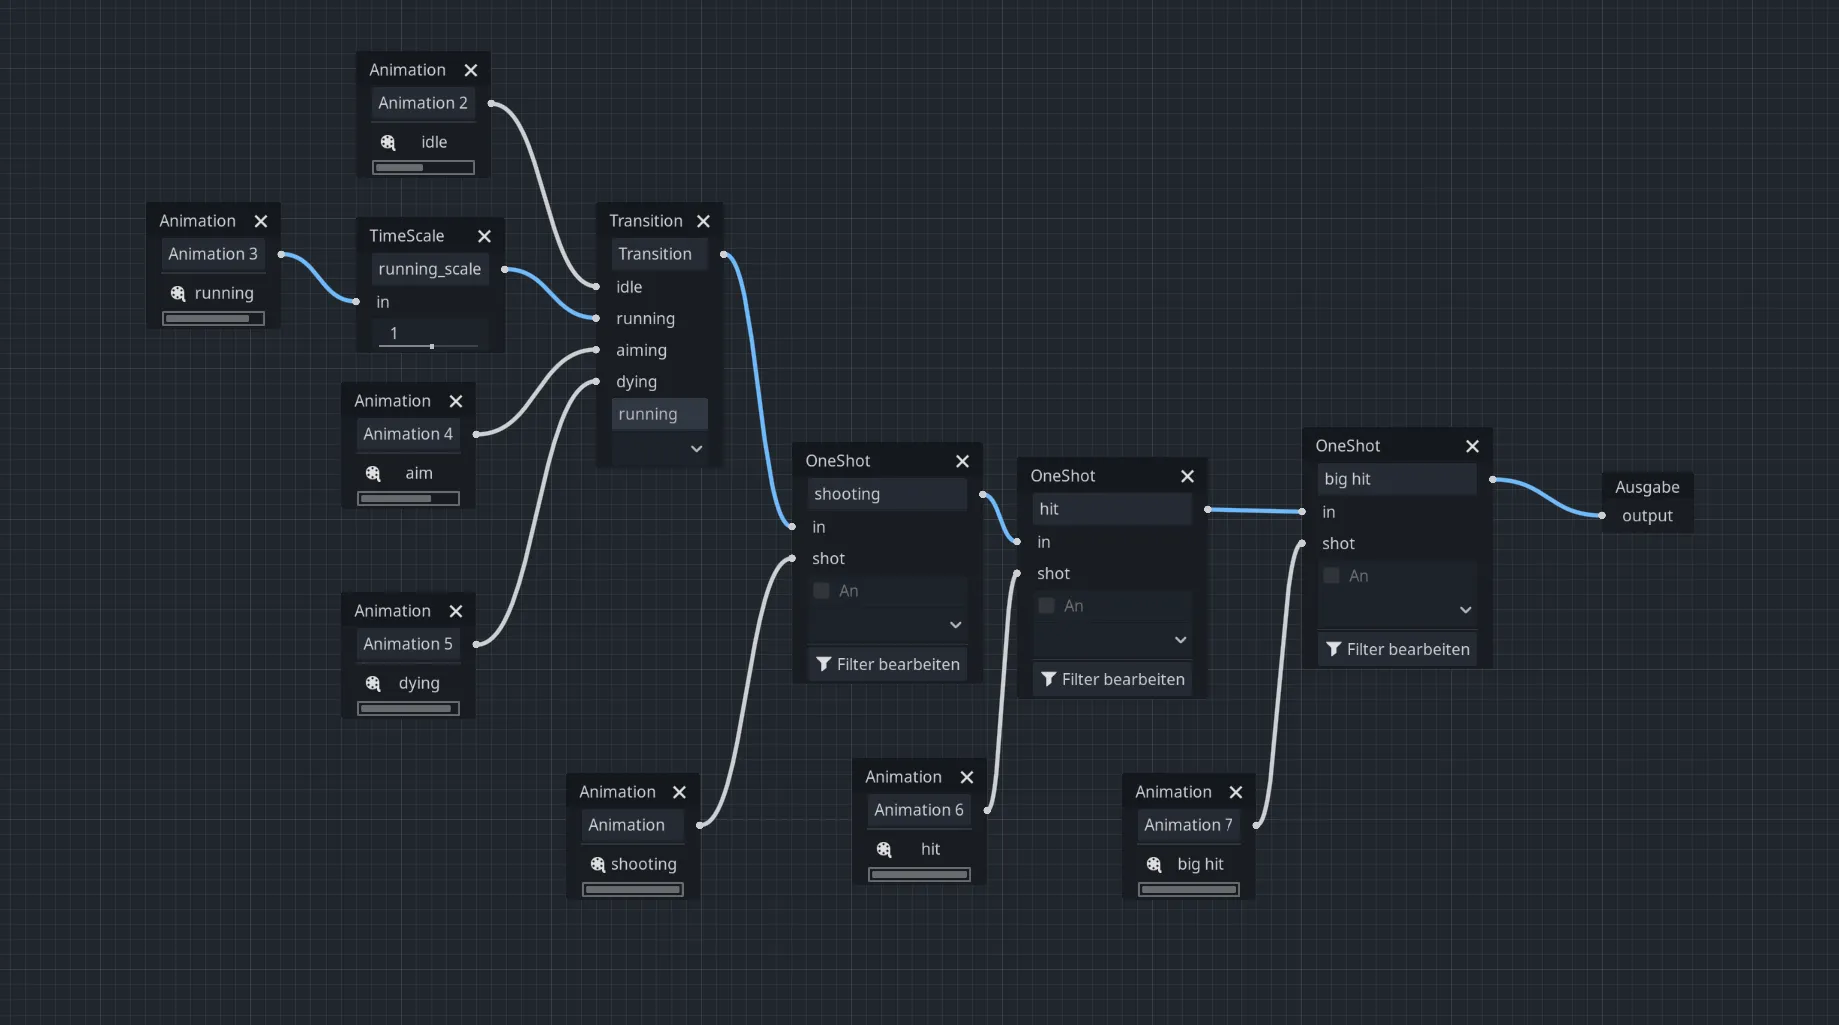
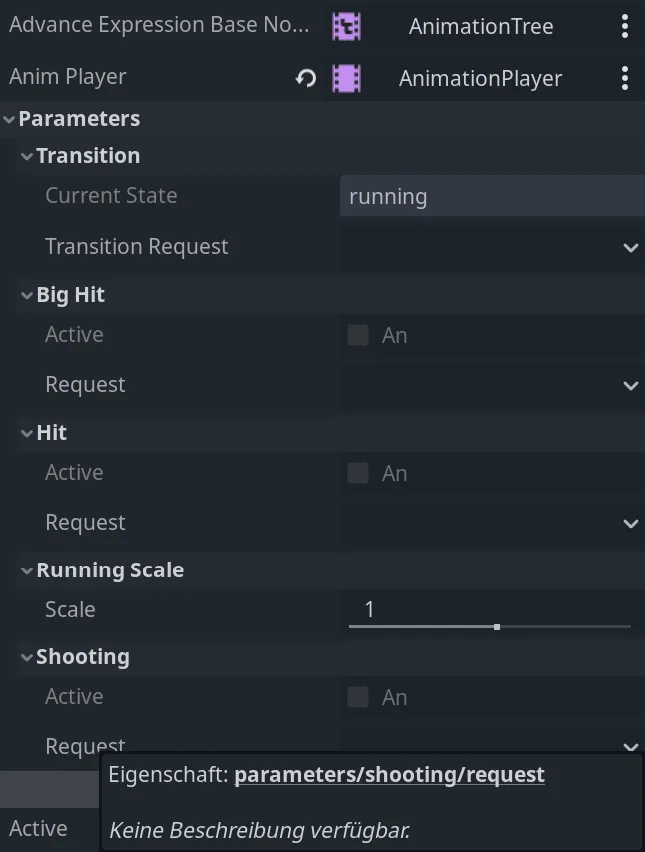
Here you can see how the AnimationTree is structured, it looks very similar different engines. It is a node-based editor in which animations can be linked together in different ways to create a final animation. On the left you can see the “idle”, “running”, “aim” and “dying” animations that have been linked to a transition. This allows you to control which of the animations is currently active and that it also interpolates between the animations over a predefined period of time, when switching between them. The animations can be interrupted at any point, not just at the end of an animation. With “running” there is also a time scale in between, so the animation can be sped up or slowed down, if we link this to the character’s movement speed, the animation is played faster if the character moves faster.
If you change an animation via the transition, only this animation is played, either in an endless loop or, as with “dying”, once and then the last animation frame is held. With OneShots, an animation can start and at the end of the animation it automatically returns to the previous animation. So if someone is hit, the corresponding animation is played once and then it would automatically return to the idle animation that is linked as “in” for the OneShot.
Each of the elements such as “Transition”, “Running Scale” or the OneShots “Shooting”, “Hit” and “Big Hit” are available as separate fields in the inspector. You can set a value for them in the code via the property path.
I have written 2 methods for my character to play animations, ChangeAnimationState that changes the transition and PlayAnimation for OneShots. With ChangeAnimationState you use set from the AnimationTree to change the property, whose path you get from the inspector.
I also created a static class for the animations so that you get some autocompletion when selecting the animation and don’t have to rewrite the string every time.
1 | |
Unfortunately, Godot is limited to C# 10, which means that things like primary constructors are not supported. This would have made it possible to write a type-safe variant of the animation class very shortly:
1 | |
In the PlayAnimation you can see how to turn an event or callback into a task. We trigger the OneShot animation and then write the “request” for the animation in a list. When we are informed later via an event that the animation is over, we complete all TaskCompletionSources for this animation.
1 | |
If we want to perform an action, then play an animation, and then change the GameState when the animation has finished playing, it is useful to be able to “await” an animation. This allows us to write the code for firing a weapon a little easier, instead of having to listen for separate events or pass a callback.
1 | |
We prevent further actions in the UI here, deduct the action point for shooting, play the animation and only after the shooting animation has been played, the target unit receives damage and then plays its own animation instead of everything happening at once. Otherwise the enemy would receive damage and play its hit animation before the enemy has even fired the weapon.
Grid Movement
For the game I wanted the characters to move in a grid. Each character has a movement range that he can cover in one turn and if there is an obstacle on the map, the available spaces should be calculated around the obstacle accordingly.
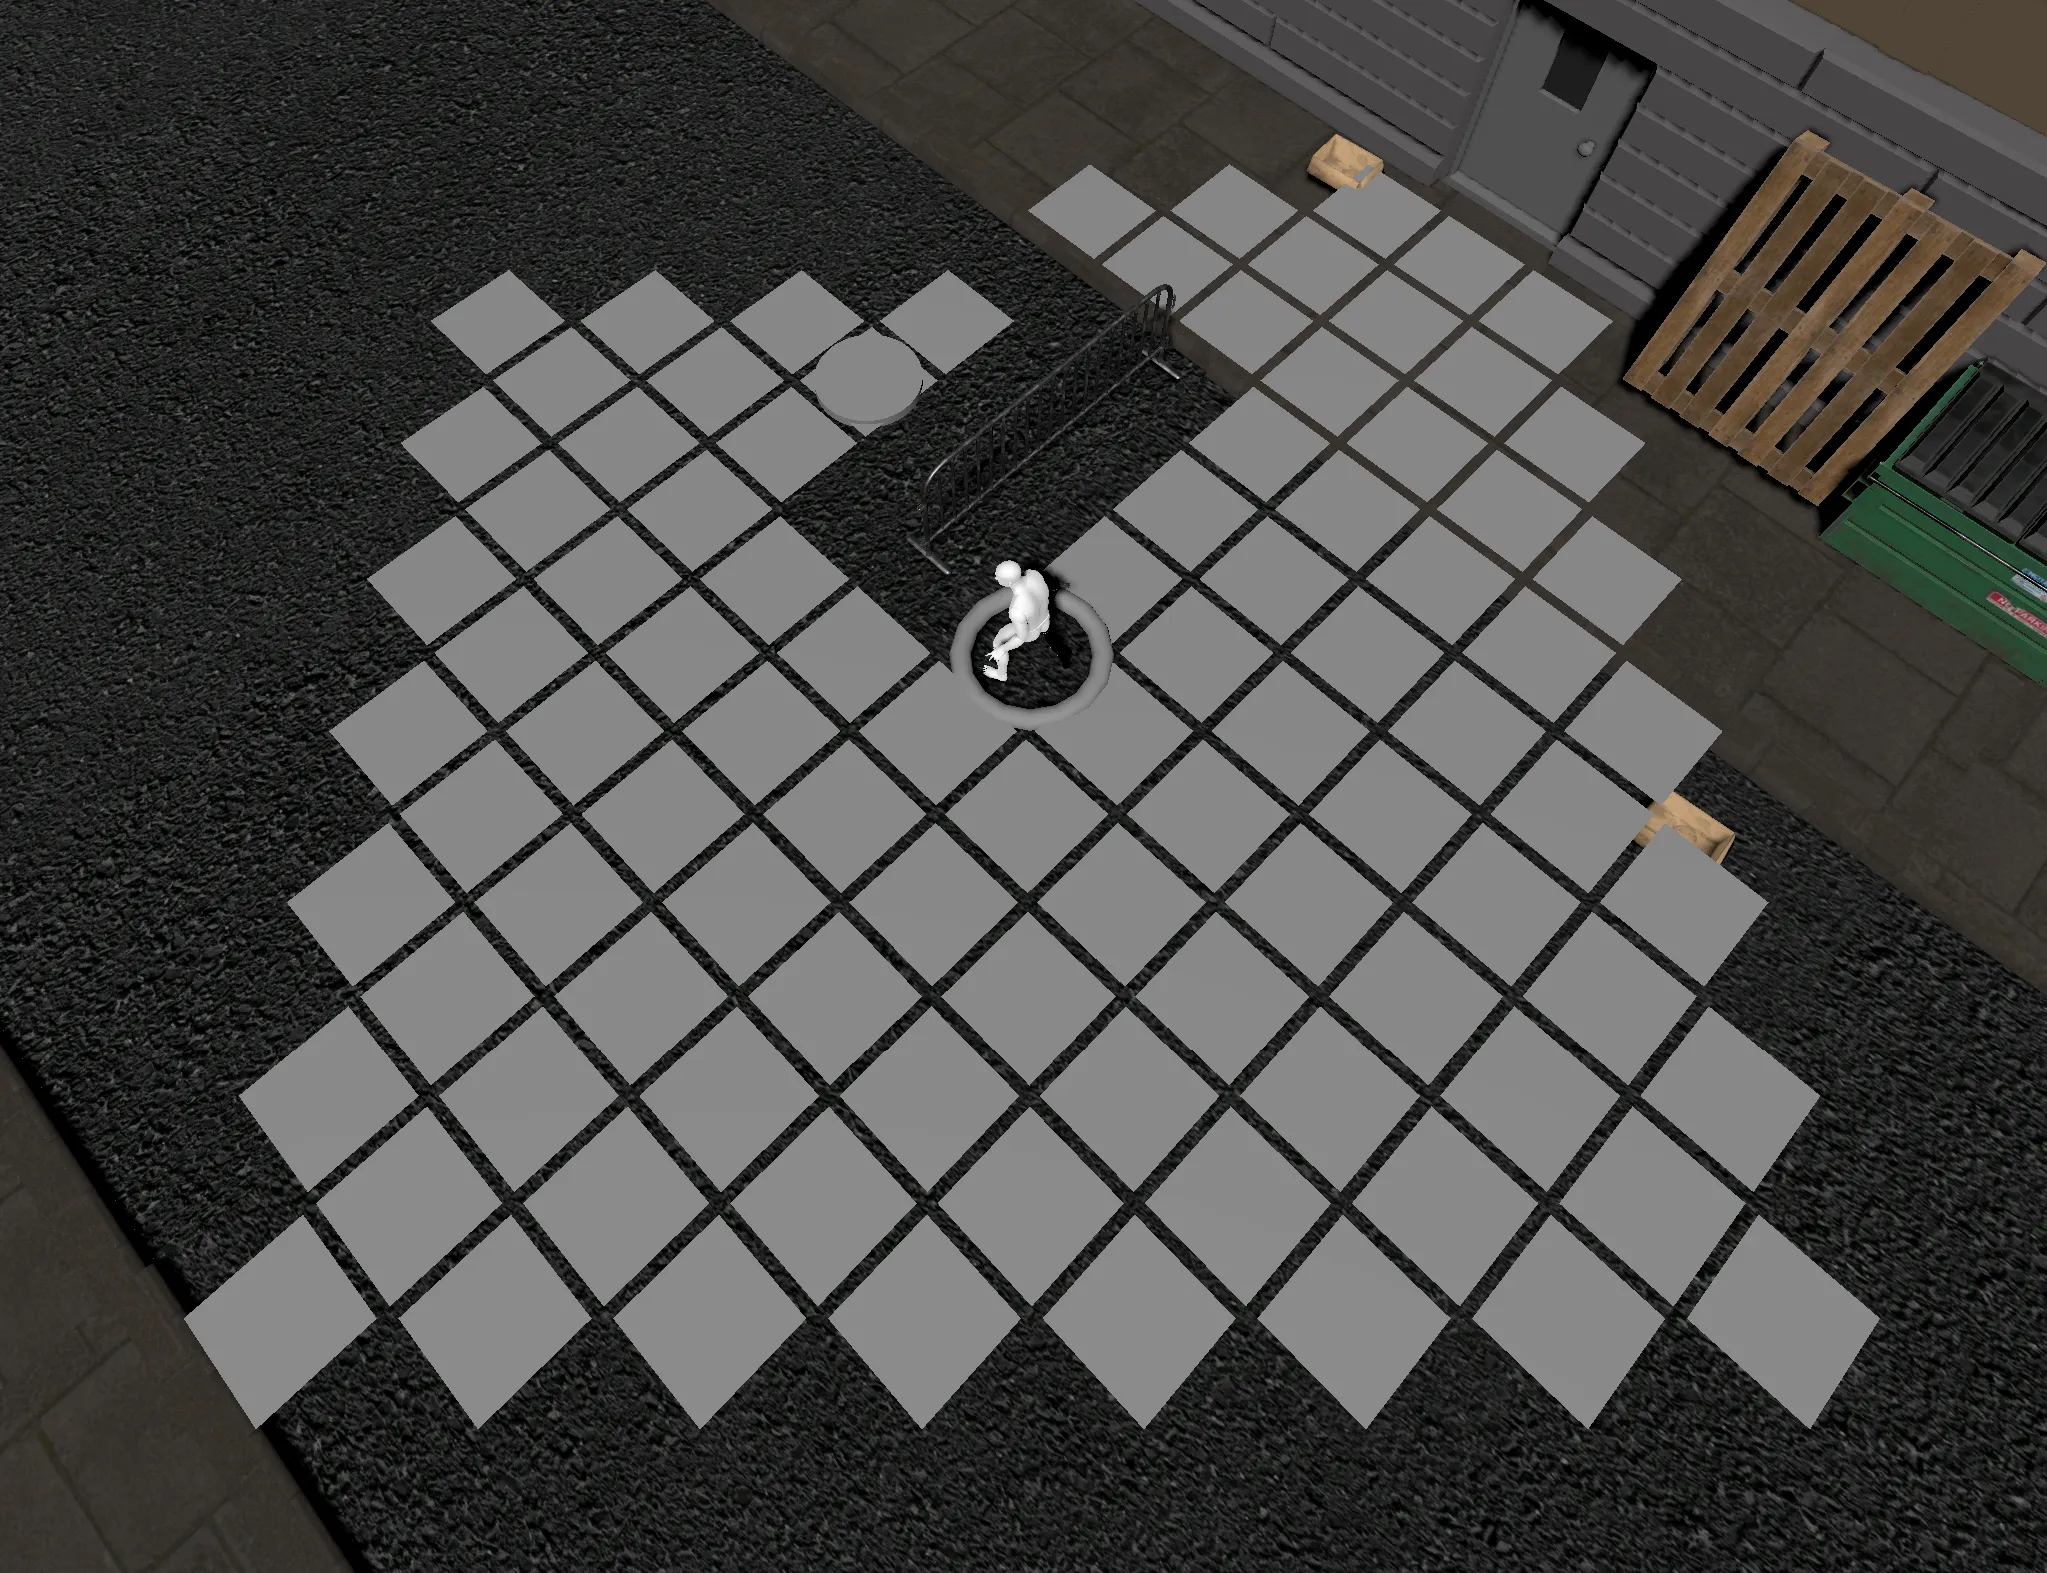
I build a grid for this, with fields corresponding to the movement range x 2 + 1 and then check each field on the grid to see if there is a collision with a relevant object.
1 | |
Then I do a FloodFill from the player’s position to mark all accessible squares.
1 | |
I then create a small square for each accessible field, in the future this could have been done better by only displaying the outline of the accessible area, but for the beginning this should be enough.
Path Finding
Godot offers an implementation for Path Finding in 2D and 3D, which allows an “agent” to find a route on its own when you specify a destination. The agent will then run around obstacles and try to take the shortest route. You link the CharacterBody3D node for a character to a script and in the _PhysicsProcess method of the script you ask the agent for the next destination. The route is divided into segments when calculating the route, you ask for the destination point of the current segment and if the distance is small enough, the NavigationAgent3D node automatically selects the next segment until you reach the destination. In the code you can query whether the navigation has been completed and then react to it.
To execute the movement itself, Godot offers the functions MoveAndSlide and MoveAndCollide. For MoveAndSlide you set a Velocity beforehand and Godot tries to move you along this velocity (distance per second), if there was a collision the function returns true and lets the character slide around an obstacle instead of just standing still. With MoveAndCollide you explicitly specify the distance you want to move in a frame and a Collision object is returned if applicable, which contains details about the collision, for example what you collided with, at which point and in which direction the collision occurred.
I used MoveAndCollide for this because it gives you the ability to interact with your environment, so in the game if you run into a cardboard box you can kick it around.
The code for this looks like this:
1 | |
The normal of the collision is the direction of the point of contact between the objects, multiplied by -1 the direction is rotated by 180° so that the force points to the cardboard and not to the unit. The applied force is then the speed² x weight of the character x delta. Delta is the time since the last frame in seconds. At 60fps that would be 0.016 seconds.
That is the equivalent of the formula: $F = m × a$
The box is created as a RigidBody3D node in Godot, if you apply a force to it, the object can be thrown around. An unnecessary but fun little gimmick that I included while I was familiarizing myself with Godot.
A somewhat unpleasant behavior of the navigation is that the agent is not moved exactly to the target, even if the target location is free. For example, the agent has a radius of 0.5m, which it needs to avoid getting stuck on obstacles. Unfortunately, the agent then stops at the destination even if it is actually still 0.5m away. This is not enough here, he has to move to the center of a square and must not stand halfway outside. Unfortunately, I had to add some navigation code of my own, so that the character, after reaching the goal, simply moves the last bit in the direction of the goal, without any path finding.
To be on the safe side, I calculate the expected duration at the start of a route and start a timer with its expected duration + some buffer, after which the unit simply teleports directly to the destination. When playing XCOM, I often had the problem that a unit got stuck somewhere, the game then had a soft lock and you had to reload.
The route the agent uses is based on a “NavigationMesh”, which can be generated with a NavigationRegion3D, that’s the semi-transparent turquoise area on the picture.
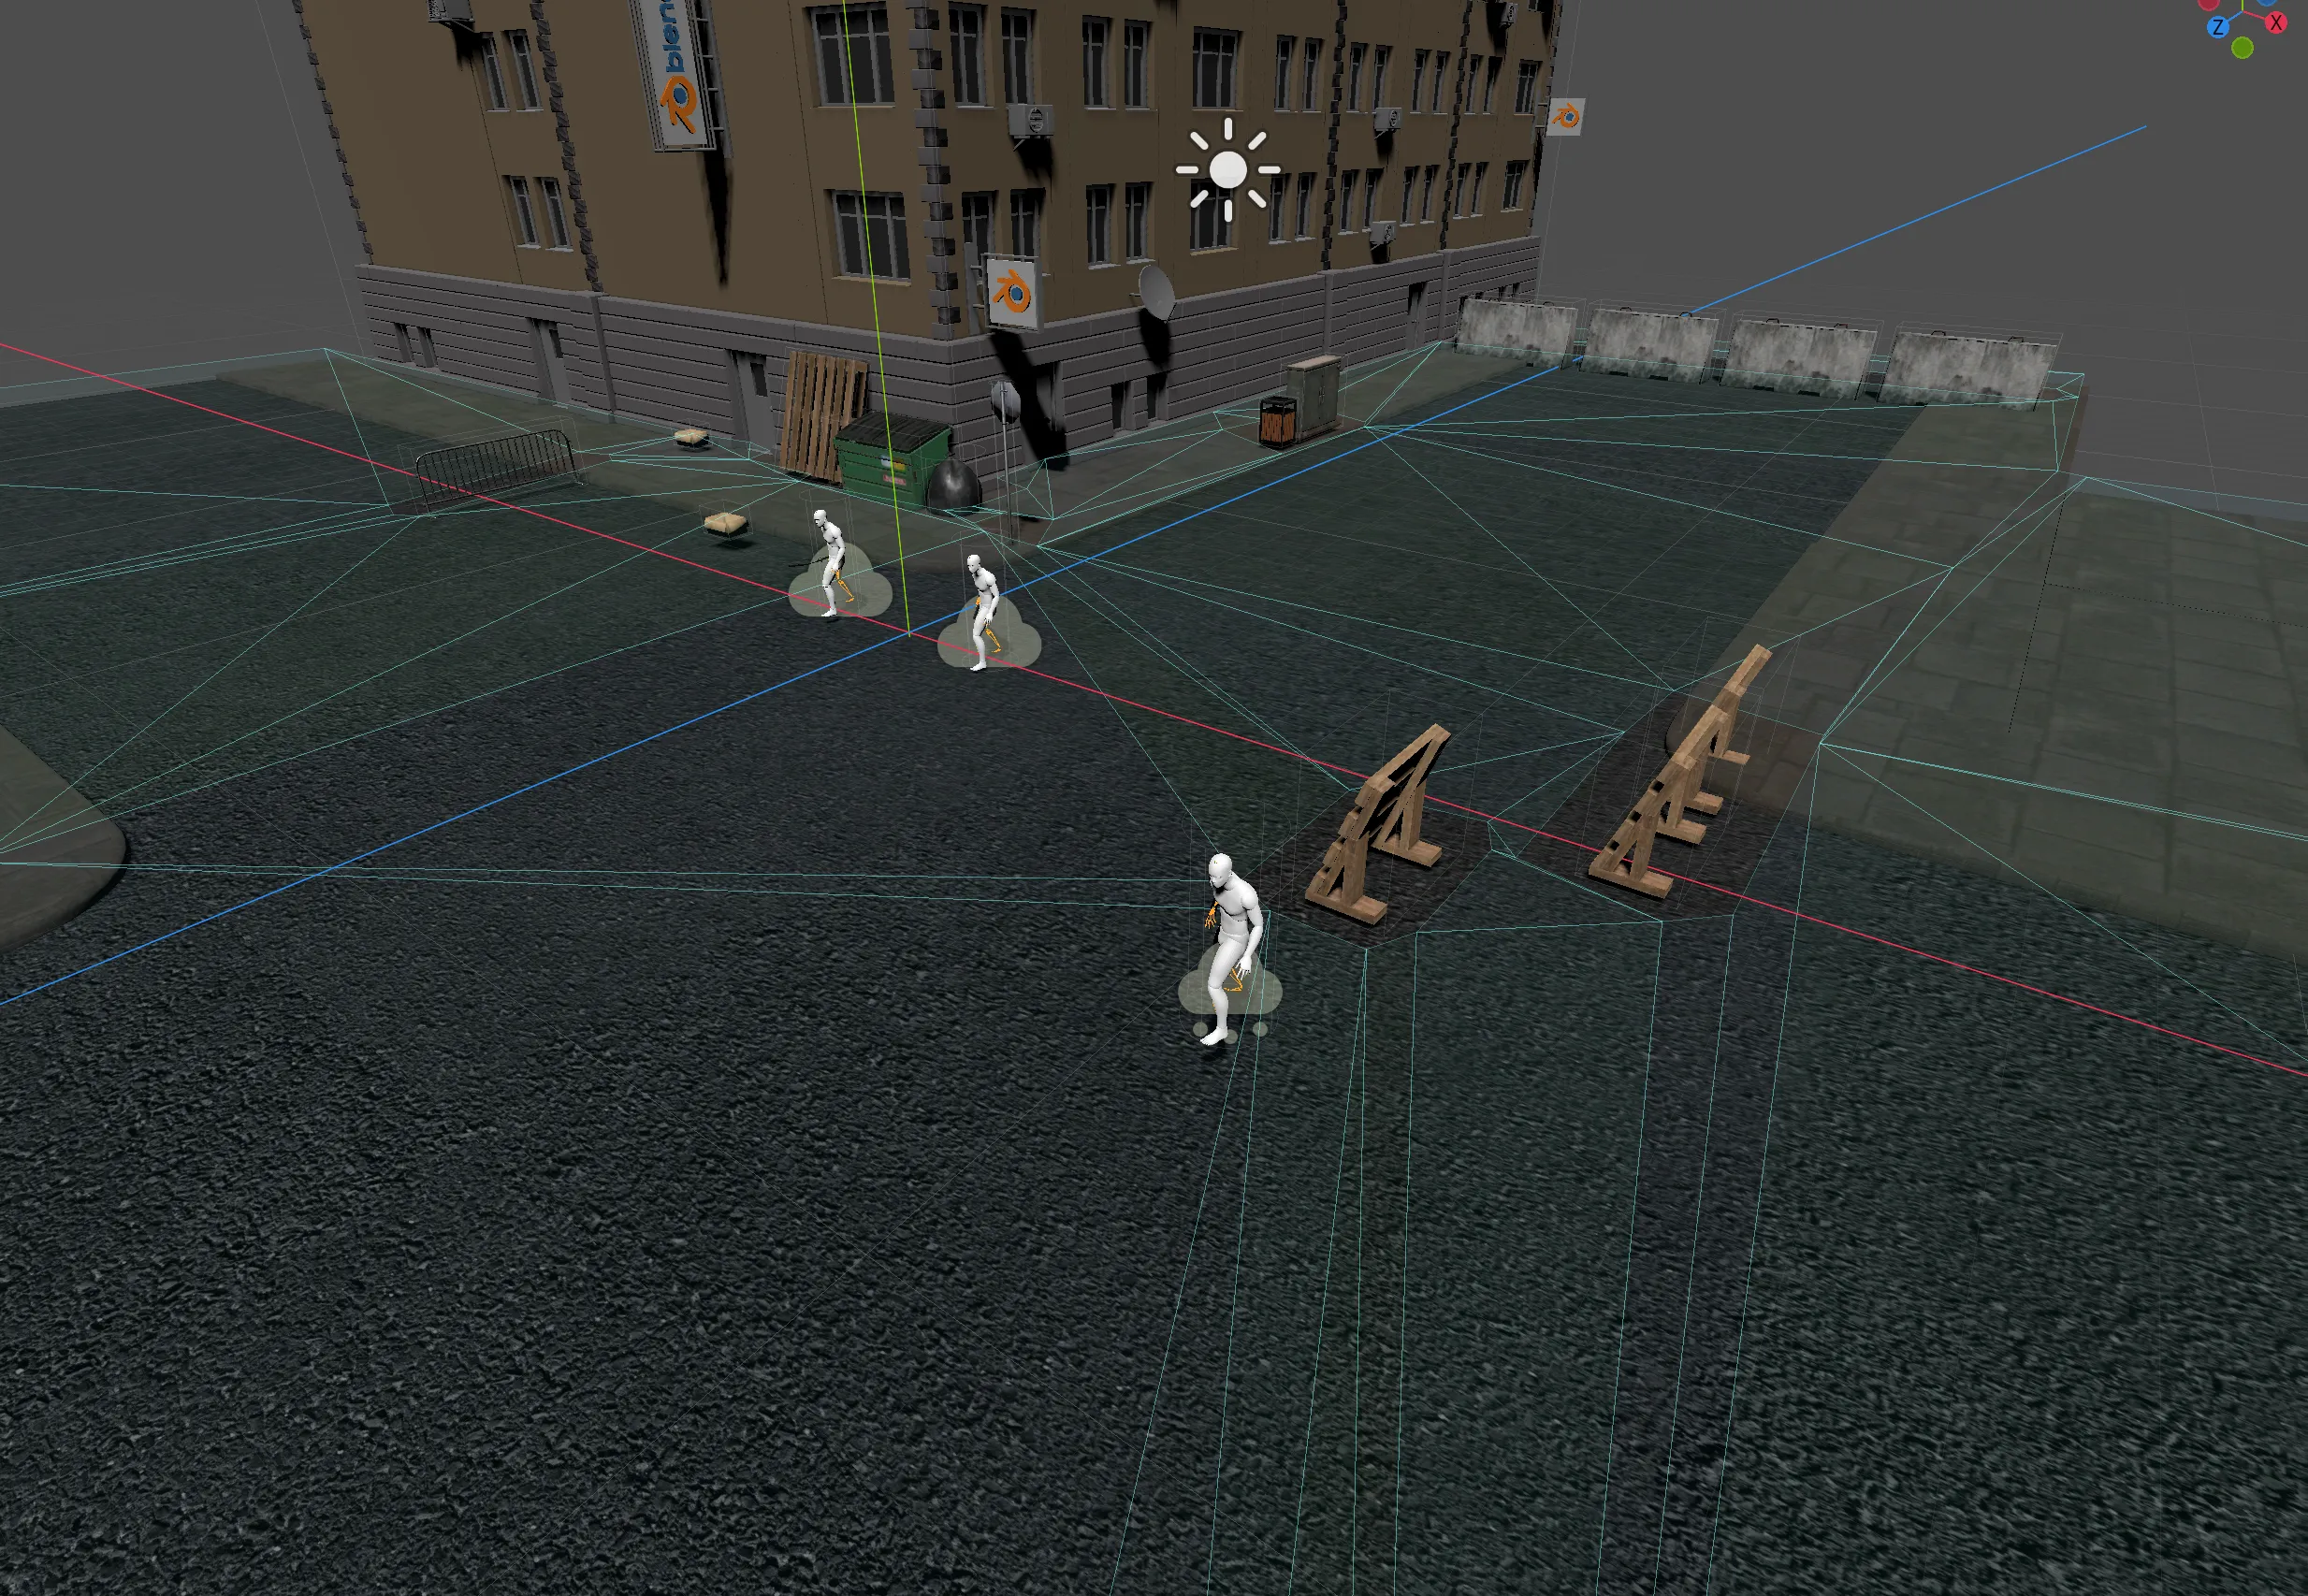
The vertices and edges of the mesh go around collision objects. When generating the mesh, you must also specify the size of the agent so that it moves correctly around obstacles and does not get stuck on them. For this NavigationMesh, only nodes that inherit from StaticBody3D are taken into account. Unfortunately, this node type is only intended for objects that cannot move in the scene. However, the units are CharacterBody3D, if units are supposed to be able to move past each other, it is a bit more complicated.
Agent Avoidance
In Godot, the ability to move around non-static obstacles is called Agent Avoidance. Unfortunately, the system is not very clever. It works similarly to MoveAndSlide, except that you have to retrieve the adjusted velocity via an event later in order to execute the movement. The calculation of how one character should move to avoid another takes place asynchronously. Unfortunately, it only works when both characters dodge each other, if only one character is supposed to dodge the other, the character slides back and forth and gets stuck. According to some Github issues, there are also some other scenarios in which the agent avoidance does not work and it is not planned to change this, instead in future versions only a note will be displayed, saying that the system has various restrictions. Unfortunately, the Agent Avoidance system was not really an option for me.
I could also generate the NavigationMesh anew for each move. The problem with this is that CharacterBody3D is not taken into account in the NavigationMesh and you can’t make any settings to change this. Adding a StaticBody to the character doesn’t work either, because it doesn’t look at the child nodes of a CharacterBody3D. Instead, I would have to change the hierarchy of the nodes to create the mesh, which comes with its own problems.
Alternative Navigation
There are a couple of ways to solve the navigation problem, either I write my own navigation system and discard the Godot solution completely, or I try to still use it but create my own NavigationMesh that also handles CharacterBody3D properly.
I spent some time creating the NavigationMesh myself, the difficulty was mainly understanding what format it expects the mesh to be in. I also have no way to display the already existing turquoise DebugMesh from the image above for self-created NavigationMeshes. The first attempt to create a NavigationMesh didn’t work and its very difficult to debugg it, so I had to create my own DebugMesh for my solution in order to make progress. This has all taken up valuable time so far. I haven’t finished the algorithm for it, so I won’t post it here. The DebugMesh looks good, but it may well be that the orientation of the mesh is wrong, or that I need to filter out more. At the moment a square is created in the mesh for each square of the grid, rather than just making the mesh from the edges of the accessible area. When I continue programming the game I’ll probably try to finish that, for now I’ve disabled collision between units. You can’t select the sqaure of another unit as a target, but if a route leads through it, the unit simply moves through the other one.
The other solution would be to have units just move in the grid that I have already calculated and then move from one cell to the next. Unfortunately, that wouldn’t look so great, at least with “diagonal” movements.
Camera
I was looking for a camera system for the game, there were a few that looked interesting, like Phantom Camera, but when I installed it I saw that it was quite a lot and a bit unnecessarily complicated. I then looked for something simpler. I don’t really need much for the game, but I couldn’t find a camera control that I liked. That’s why I wrote one myself, it works very well for me and is even shorter than anything I found online.
1 | |
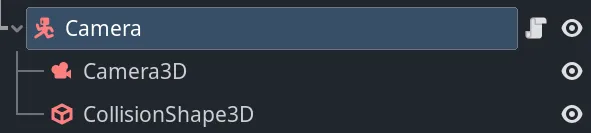
This is an “orbit” camera, it always looks at a specific target. The camera is a child node of a CharacterBody3D, which is the target that the camera is constantly looking at. The transformation (translation, rotation, scale) of child nodes is relative to the parent node, which means that a change in position also affects all child nodes. So if you move the target, you also move the camera at the same time and this way you can move through the map. The CollisionShape3D is in the same position as the camera, so the CharacterBody3D can collide with the environment, this makes sure that you cannot move the camera through buildings or other obstacles. The rotation of the target also makes it easy to rotate the camera. When the target rotates, the camera automatically rotates around the target.
Final camera position = target position + target rotation + camera position
You can think of it like this: each of the operations adjust the coordinate origin, when we do a translation, the new center of the world is at the location of the target translation, with the rotation the whole world rotates and then when we do a camera translation, it happens locally along the X axis, but because the world has been rotated by 45°, the X axis is now at a 45° angle relative to the world. This means that when we adjust the target rotation, the camera moves around the target position.
The last stand
Some other stuff we had done, but which has not yet been described here:
- simple start menu with options for volume
- music for menu and combat
- units had health points, action points and initiative values that determine the order of the units
- units took turns and ended their turn automatically when the action points were used up
- a Colt as a ranged weapon, you could only select enemy units, which were then shot
- units could wear armor that reduced the damage they received
- you could cancel actions such as aiming at an opponent
- when units took damage, they would play an animation and a number would appear above them representing the amount of damage taken and it disappear again with an animation
- when enemies can be targeted, a 2D frame is placed around the unit, the position and size of which adapts to the unit’s bounding box
- equipped weapons are in the hands of the characters and move with them
- units turn towards the target you are aiming at
- units can die and the collision for that unit is then disabled
- there is a sword as a melee weapon, although the aiming system for this has not been finalized
- there is a “shadow ability” that you can activate for units, this allows the unit to move through obstacles and it creates a particle system on the unit to show that the ability is active
The last task I was still working on was to implement an AI for enemies, I wanted to use LimboAI for this, but hadn’t created anything useful yet.
This is actually a good basis that could perhaps be reused for the next game jam, in the hope that I wouldn’t have to adapt too much for a new theme. The current mechanics would then have to be finalized, make the assets pretty and maybe we would also have time for a progression system, which was originally planned. The progression would be that you have to play through several maps to get a victory screen and the units can unlock new abilities between missions.